Introduction
In our previous article, we learned how to implement Text-to-Speech in Flutter. Today, we will learn the reverse of it. Speech-to-Text. Just like TTS, Speech to text is also a very helpful feature that you can add to your apps. So without wasting any time, let's get started.
Project Setup
First of all, we will add the package as a dependency and also import it in the dart file where we will be coding our logic.
dependencies:
  flutter:
    sdk: flutter


  # The following adds the Cupertino Icons font to your application.
  # Use the CupertinoIcons class for iOS style icons.
  cupertino_icons: ^1.0.2
  speech_to_text:
import 'package:speech_to_text/speech_recognition_result.dart';
import 'package:speech_to_text/speech_to_text.dart';
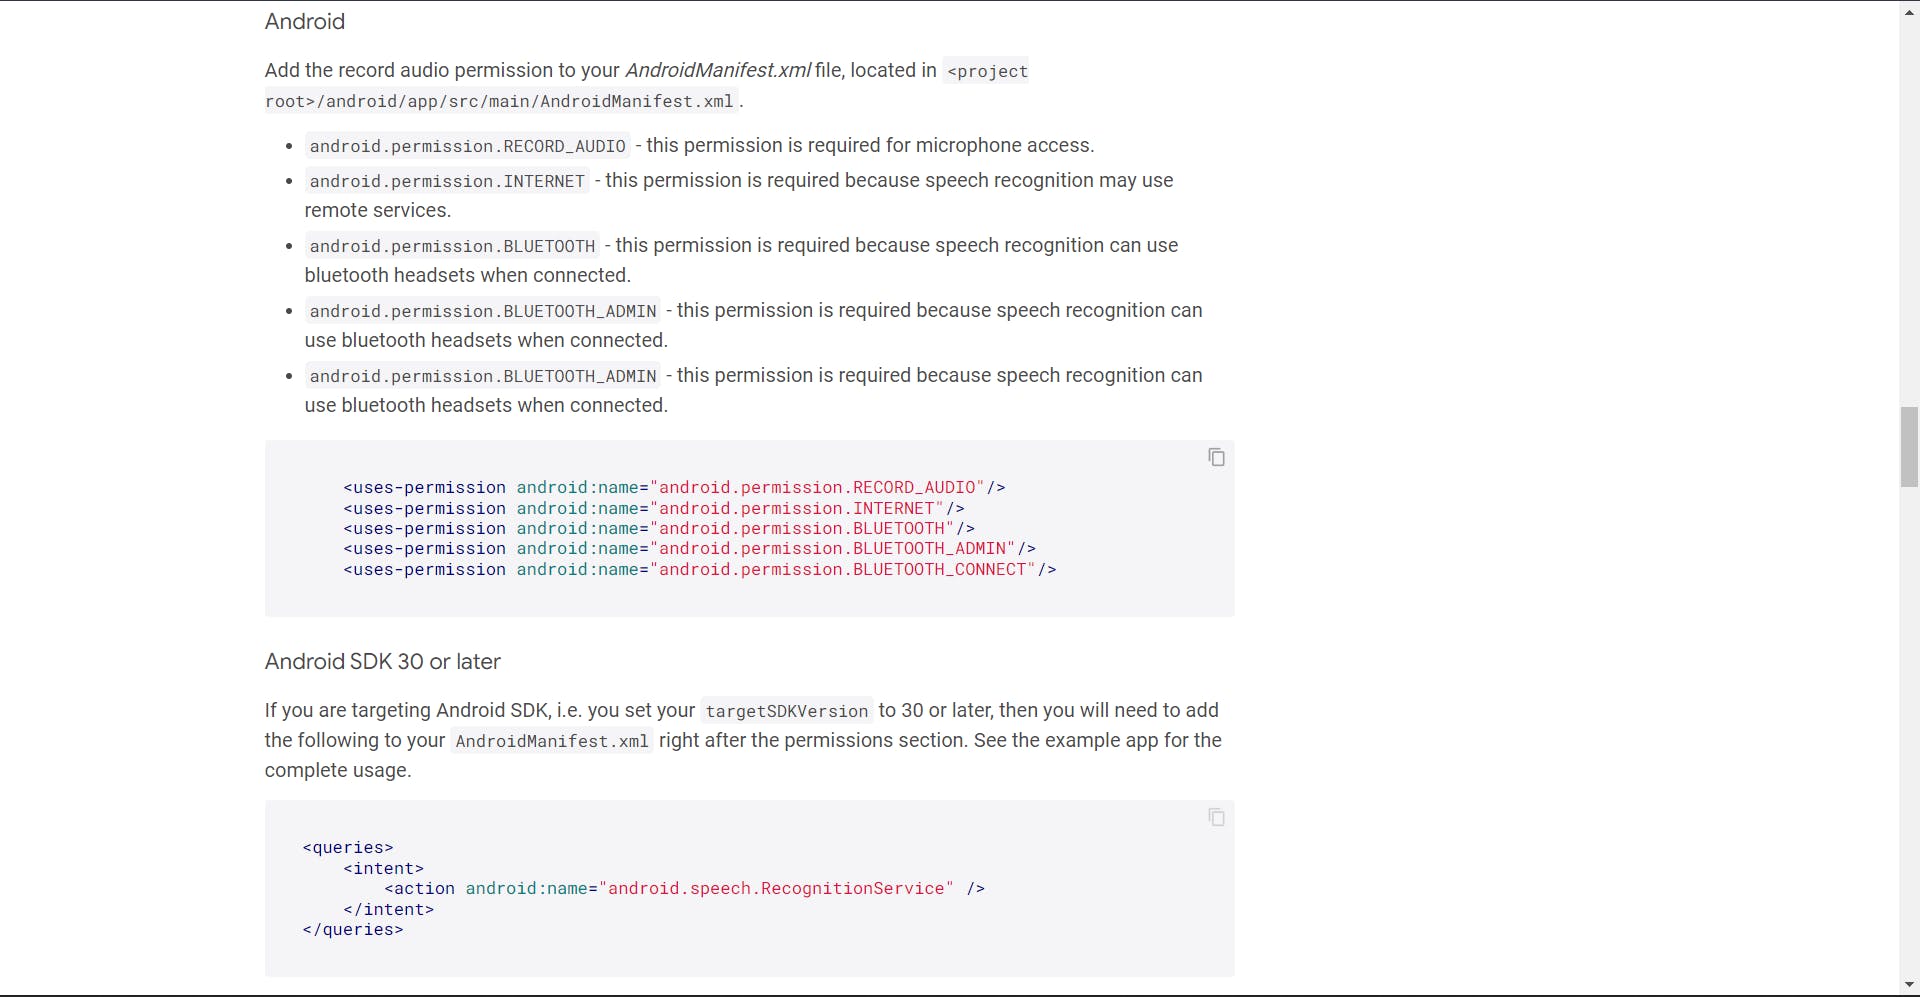
We will need to add some permissions for android as well as ios for this feature to work. For android, do these changes

To make things work in iOS, make these changes

With all the necessary changes made, we have setup our project. Now let's move on the coding part
Coding the Logic
We will first look at the functions that handle listening to audio and converting them, after that we will create the UI. The UI will contain of Text in the center and a FAB to control the mic.
Step 1
Create 3 variables. One will be the instance of SpeechtoText class, another would be a boolean which tells if the mic is active or not and third one is a string which will contain the words that have been spoken in the mic.
SpeechToText _speechToText = SpeechToText();
bool _speechEnabled = false;
String _lastWords = '';
Next up, we will initialize our Speech-to-Text service inside a function and call that function from the initstate. This initialization needs to happen only once and in the beginning.
@override
  void initState() {
    super.initState();
    _initSpeech();
  }

  /// This has to happen only once per app
  void _initSpeech() async {
    _speechEnabled = await _speechToText.initialize();
    setState(() {});
  }
Step 2
Now we will write the start listening function. Whenever a user speaks something in the mic, we will listen to it and convert it into text in realtime. Here is the code for it
void _startListening() async {
    await _speechToText.listen(onResult: _onSpeechResult);
    setState(() {});  // so that the changes are visible on screen
  }
You can see that there is an _onSpeechResult function. This function is basically a callback which is doing the task of converting speech and storing the result in our _lastwords variable. Here is the code for that function
void _onSpeechResult(SpeechRecognitionResult result) {
    setState(() {
      _lastWords = result.recognizedWords;   // result variable stores all the data.
    });
  }
So this completes our logic for the part where a user starts speaking. Now, we will look at the part when the user stops speaking. This part is very easy actually. Just one line of code
 /// Manually stop the active speech recognition session
  /// Note that there are also timeouts that each platform enforces
  /// and the SpeechToText plugin supports setting timeouts on the
  /// listen method.
  void _stopListening() async {
    await _speechToText.stop();
    setState(() {});
  }
Step 3
Now that our logic part is done, let's quickly create the UI. As mentioned above, we need a Text widget to display the current text spoken by the user and need a FAB to toggle the mic. Here is the code for the Text widget
Expanded(
 child: Container(
 padding: EdgeInsets.all(16),
 child: Text(
 // If listening is active show the recognized words
 _speechToText.isListening
     ? '$_lastWords'
                           : _speechEnabled
                          ? 'Tap the microphone to start listening...'
                          : 'Speech not available',
                ),
              ),
There are a lot of ternary conditions in the above code, so let us simplify it. First of all we check if the isListening variable is true or not. This is an inbuilt variable of the SpeechToText class. If the speechToText class is listening to us, then we will simply show the content of the lastwords. lastwords store text that is converted from speech.
If the service is not listening to anything, then we check if our _speechEnabled variable is true or not, if it is true, then we ask the user to turn on their microphone so that TextToSpeech can listen to what user is saying.
Now, let's quickly look at the code for FAB.
floatingActionButton: FloatingActionButton(
onPressed:
// If not yet listening for speech start, otherwise stop
_speechToText.isNotListening ? _startListening : _stopListening,
tooltip: 'Listen',
child: Icon(_speechToText.isNotListening ? Icons.mic_off : Icons.mic),
),
I hope the comments in the code can clearly explain the logic. It is pretty easy. Now, run your app on your Android or iOS device and tap on the mic icon below. Once it is activated, start speaking something and you will see your words being converted into text and displayed on the screen.
Conclusion
So with this, we conclude today's article. Now you know how to build a Speech-to-Text feature in your app. It would be great if you could come up with some innovative ideas to use this feature in an app. I hope that you learned something new today.
You can appreciate and support my blogs via.

Also, let's connect on Twitter. Follow CSwithIyush for more amazing tutorials, tips/tricks on Flutter & DSA.

