Table of contents
Introduction
In the previous article, we had a look at the basics of a Binary Tree. We studied about its declaration, its properties, etc. In this article, we will have a look at how we can traverse a binary tree. So let's get started.
Depth First Traversal
The tree traversals are mainly divided into two parts. One is depth first traversals and the other is breadth first traversals. In depth first traversals there are 3 ways to traverse a tree.
- Pre-Order Traversal
- In-Order Traversal
- Post-Order Traversal
In all the 3 traversals, one thing is common, we always explore the left subtree of a particular node first. Once we are done doing that, then we explore the right subtree.
The difference between these 3 traversals is the way we print our current node.
- In pre-order traversal we print the data before going the left and right subtree.
- In in-order traversal we print the data after fully exploring the left subtree but before exploring the right subtree
- In post-order traversal we print the data after fully exploring the left and the right subtree.
Let's have a look at the code for all 3 traversals.
void Preorder(Node* node) // function for preorder traversal
{
    if (node == NULL)
        return;

    /* first print data of node */
    cout << node->data << " ";

    /* then recur on left subtree */
    Preorder(node->left);

    /* now recur on right subtree */
    Preorder(node->right);
}

void Inorder(Node* node) // function for inorder traversal
{
    if (node == NULL)
        return;

    /* first recur on left child */
    Inorder(node->left);

    /* then print the data of node */
    cout << node->data << " ";

    /* now recur on right child */
    Inorder(node->right);
}

void Postorder(Node* node)  // function for postorder traversal
{
    if (node == NULL)
        return;

    // first recur on left subtree
    Postorder(node->left);

    // then recur on right subtree
    Postorder(node->right);

    // now deal with the node
    cout << node->data << " ";
}
As you can see, we are recursively calling the function and exploring the left part and the right part of the subtree. This is how you traverse with a depth-first approach. The recursion part may not be easy to understand as a beginner. If you don't know what recursion is then I highly recommend you to watch this video
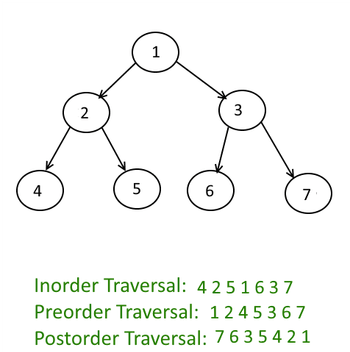
If you run all the code for all three traversals on the tree in the below image. This will be the outcome.

Breadth First Approach
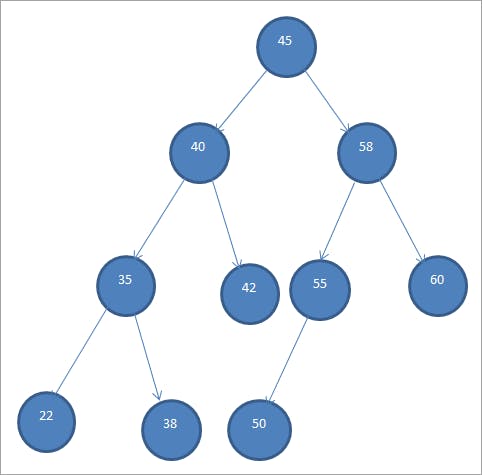
In Breadth First Approach, we traverse a tree level by level. If there is a tree like this:
 then our output would be 45,40,58,35,42,55,60,22,38,50. This type of traversal is called as level order traversal.
Let's have a look at the code through which we can implement level order traversal.
void LevelOrder(Node* root)
{
    // Base Case
    if (root == NULL)
        return;

    // Create an empty queue for level order traversal
    queue<Node*> q;

    // Enqueue Root and initialize height
    q.push(root);

    while (q.empty() == false) {
        // Print front of queue and remove it from queue
        Node* node = q.front();
        cout << node->data << " ";
        q.pop();

        /* Enqueue left child */
        if (node->left != NULL)
            q.push(node->left);

        /*Enqueue right child */
        if (node->right != NULL)
            q.push(node->right);
    }
}
I hope you understand how the code is working. Using the queue is an important decision because it helps us to achieve what we desire.
We planned that, for a node, we will first explore its left child only and its right child. That is what we are doing in the above code. We push a node, we output the value of the node, then we check if left child is not null, we push it in the queue. We do the same for its right child.
Don't know what a queue is? Go read this beginners' guide on Queues.
Conclusion.
So with this, we wrap up our article on Tree Traversals. Tree Traversals are tricky if you don't get the hang of what is happening logically. If you understand the logic then it is super easy to execute.
You will need different type of traversals depending upon the question you are solving. In the next article, we will have a look at a special type of binary tree. It is called as a Binary Search Tree. Untill then, keep practicing and playing around with traversals in your IDE.

