


Introduction
In today's article, we will continue building our secure authentication service. Today's topic of concern is register and log in API.
We will see how we can register a user with an email id password and then log him/her in by providing him/her an auth token. We will also use rate-limiting and mongoose to store the user's details. So let's get started.bac
User Schema
Before making our api, we must decide how our user schema should be. It is very important to clearly define our schema.
For our app, the user schema would look something like this
const userSchema = new Schema ({
    email: {type : String},
    password: {type : String},
    userName: {type : String},
    phoneNumber: {type : String}
})
We will have email, password, username, and phone number fields. We can make some of these fields required by adding the required: true beside the type key. I don't need anything to be required because we are supporting 2 types of sign-up. One is via email password and the other is via mobile and OTP.
Usually in real-world apps, the user schema is vast and it varies from app to app. Some apps would keep other things like profile picture, default address, default payment method, etc in the user schema as well.
Ideation
Now that we have defined our schema, let's have a look at the flow chart of how a registration request should happen
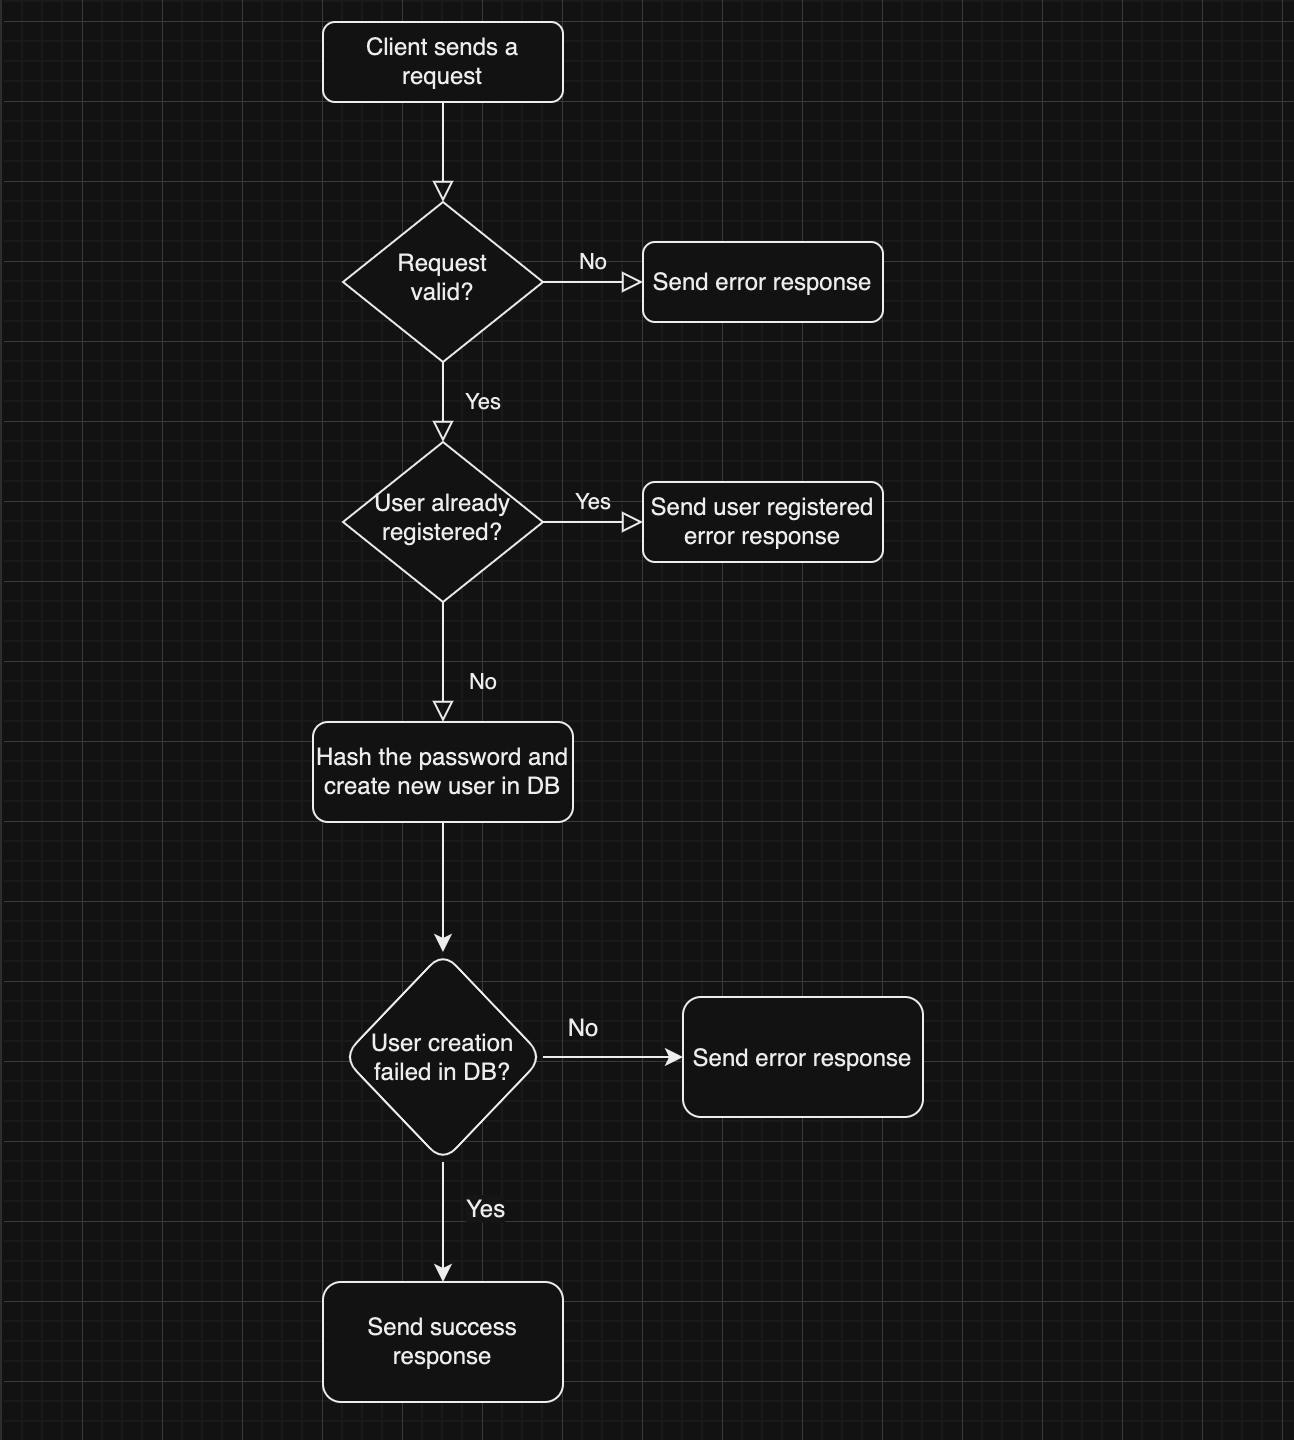
Pretty simple right?
Let's execute this flow chart one box at a time.
Execution
Step 1
Since the client is sending a request, we have to catch the request somehow. Also, where is the client sending the request to? Who decides that? We do.
We create a unique endpoint where all the clients will send the request if they want to register a user. In all the URLs the base url is common. For example amazon.com is the base URL and amazon.com/orders or amazon.com/wishlist are unique endpoints. /orders and /wishlist is the endpoint.
A structured app has very well-defined endpoints. There are a lot of do's and don't while creating your endpoints. There are tons of blogs/videos out there explaining the dos and don'ts of endpoint creation.
Since we are creating an auth service and we are currently using our localhost, all our endpoints would fall under this category `http://localhost:3000/auth`.
So our register endpoint would be `http://localhost:3000/auth/register`. Similarly, we will have endpoints for login, otp , get-users etc.
Step 2
Now that we have decided on our endpoint, let's catch the request and validate it. Check out the code below for the same.
const validateRegisterRequest = (req,res,next) => {

  const {body} = req

  if(!body || !body.email  || !body.password) {
    return sendErrorResponse(res,consts.STATUS_CODES.FOUR_HUNDERD, strings.ERROR_MESSAGES.NO_BODY_FOUND)
  }

  if(!isValidEmail(body.email)){
    return sendErrorResponse(res,consts.STATUS_CODES.FOUR_HUNDERD, strings.ERROR_MESSAGES.VALID_EMAIL)
  }

  if(!isValidPassword(body.password)) {
    return sendErrorResponse(res,consts.STATUS_CODES.FOUR_HUNDERD, strings.ERROR_MESSAGES.VALID_PASSWORD)
  }

  next()

}
So what's happening here? For now, let's assume, somehow the validateRegisterRequest() function gets triggered when a client sends a request to the register endpoint. The register API would be a POST API. If you don't know what is POST, GET, PUT, and DELETE or what is REST in general, I would recommend you give this article a quick read.
Every POST request has a body. We will extract the body from our req parameter. We will check if the body, email, and password exist or not. If not, we will call our generic sendErrorResponse function and pass it our response object, the status code we want to send, and the error message.
But where is this sendErrorReponse() present ? There is no correct answer to this. You can either create it in utils, or you can create a whole new error service. For now, I am showing all the stuff that is present in my error service.
const generalErrorMessage = {
    error: "",
    message: ""
}

const statusCodeToErrorTitle = {
    400: "Bad Request Error",
    401: "Unauthorized",
    403: "Forbidden",
    404: "Not Found",
    405: "Method Not Allowed",
    500: "Internal Server Error",
    502: "Bad Gateway",
    // Add more status codes and titles as needed
}


const sendErrorResponse = (res, status, errorMessage) => {
    console.log("Error me aagaya")
    setErrorMessage(errorMessage,status)
    return res.status(status).json(generalErrorMessage);
  };

const setErrorMessage = (errorMessage,status) => {
    generalErrorMessage.message = errorMessage
    generalErrorMessage.error = statusCodeToErrorTitle[status]
}
return res.status(status).json(generalErrorMessage); This line will return a JSON to our client with the status code status which we pass as an argument.
If everything is validated and there are no error responses sent. We call a next(). What is this next? Where is this coming from?
In simple terms, next() says, "I'm done with my part; let's move on to the next task in handling this request." It's like passing the baton in a relay race, where each runner (middleware/controller) does their part and then passes the baton (control) to the next runner (middleware/controller) until the race (request processing) is completed.
Step 3
In the next step, we will check if our user already exists or not. To do that, we will need to query our database. Before that, we will need to create our schema and create a new model based on that schema. We will then run our queries on that model.
const mongoose = require('mongoose')
require('dotenv').config()

const Schema = mongoose.Schema

const userSchema = new Schema ({
    email: {type : String},
    password: {type : String},
    userName: {type : String},
    phoneNumber: {type : String}
})

const userModel = mongoose.model('User',userSchema)
Create a new file called db.js and write the above code in it.
Remember the connectToDb() from the last article? We will write it's execution in this file. We will need that function to connect to our db and then only we can run queries and create schemas.
async function connectDB() {
    try {
        await mongoose.connect(process.env.MONGO_URI, {
            useNewUrlParser: true,
            useUnifiedTopology: true,
        });
        console.log('Connected to the database');
    } catch (error) {
        console.error('Error connecting to the database:', error);
    }
If you read the last article, you would remember that we created an env file and stored our secret keys and constants there. So Mongo URI is also a secret url that we dont want to share with anyone because it contains credentials of our Mongo account.
You will have to create your mongo uri by following these steps.
Go to MongoDB's official website. On the dashboard, there will be a connect button, press it. Then, select the Atlas option and then the official docs will guide you.
You can follow this article as well if you get stuck somewhere.
Once you are done creating the connection string, put it in your env file and use it like how I have used it in the above code.
Now, let's focus on our main part, checking if a user exists or not. For that, we will create a function called registerUser and call our database service function to find the user in the db.
const dbServices = require('../helpers/db')

const registerUser = async (req,res,next) => {
  const { body } = req

  const doesUserExist = await dbServices.findUser(body.email)
  if(doesUserExist){
    return sendErrorResponse(res, consts.STATUS_CODES.FOUR_HUNDERD, "User exists with the same email")
  }
}
Remember the next() in the validation function? This is the function that the next triggers. How it does that, I will tell you soon. For now, let's see what's happening above.
We extract the body from the request. We make a call to our
dbServices.findUser()and pass the email.dbServicescontains a lot of functions that we have written in db.js andfindUseris one of them. We will slowly discover all the functions present in this service as our auth service progresses.
Let's have a look at our findUser() in db.js
async function findUser(userEmail) {
    const user = await userModel.findOne({email:userEmail})
    return !!user // !! converts falsy values like null, undefined to false
}
Just a two-line function. We run a findOne query on our user model. What it does is it goes through all the documents present in the user collection and searches for a user who has the email as userEmail.
If it doesn't find any user, it returns undefined.
Back in our registerUser()we check if the user exists or not. If yes, we send back an error response to our client. If no, we then register our user in the db.
Step 4
Before registering the user, we have to hash the password of the user. For that, we will use bcrypt library's hashing password function.
const hashPassword = async (password) => {
return new Promise((resolve, reject) => {
  bcrypt.hash(password, 10, function(err, hash) {
    if(err){
      reject(err)
    }
    else {
      resolve(hash)
    }
  });
})
}
Since the hash function is asynchronous, we will have to wrap it in a promise and return the result we get. It will either resolve or reject. If it resolves, we will return the hash to the previous function, or we will return the error and it will be handled in the catch block.
The hash function takes 2 parameters, the string to hash, and the level of salt. The higher the level, the more encrypted it is but the more time it takes to create the hash.
Here is a comparison of how much time it takes.
1/23/2014  Intel Core i7-2700K CPU @ 3.50 GHz

| Salt | Iterations        |    Duration |
|------|-------------------|-------------|
|  8   |    256 iterations |     38.2 ms | <-- minimum allowed by BCrypt
|  9   |    512 iterations |     74.8 ms |
| 10   |  1,024 iterations |    152.4 ms | <-- current default (BCRYPT_COST=10)
| 11   |  2,048 iterations |    296.6 ms |
| 12   |  4,096 iterations |    594.3 ms |
| 13   |  8,192 iterations |  1,169.5 ms |
| 14   | 16,384 iterations |  2,338.8 ms |
| 15   | 32,768 iterations |  4,656.0 ms |
| 16   | 65,536 iterations |  9,302.2 ms |
Going back to our registerUser function
 const registerUser = async (req,res,next) => {
  const { body } = req

  const doesUserExist = await dbServices.findUser(body.email)
  if(doesUserExist){
    return sendErrorResponse(res, consts.STATUS_CODES.FOUR_HUNDERD, "User exists with the same email")
  }

  try {
    body.password = await hashPassword(body.password)

  }
  catch(e) {
    return sendErrorResponse(res, consts.STATUS_CODES.FIVE_HUNDERD, "User registeration failed")
  }

}
Step 5
Now only one step remains, that is to finally register our user.
For that, we will write another function in our dbServices.
async function registerUser(body) {
    try {
        const user = new userModel({email:body.email,password:body.password , phoneNumber : ""})
        await user.save()
        return user
    }
    catch(e) {
        throw ErrorEvent
    }
}
This is a very simple function. It creates a new user model instance and then calls the save method on it which creates a new document in our User table.
We then return our user and if there is any error in the process, we throw the error which will be caught by the catch block in our registerUser function.
Our registerUser function will look like this now.
const registerUser = async (req,res,next) => {
  const { body } = req
  console.log("Aagaya register")
  const doesUserExist = await dbServices.findUser(body.email)
  if(doesUserExist){
    return sendErrorResponse(res, consts.STATUS_CODES.FOUR_HUNDERD, "User exists with the same email")
  }


  try {
    body.password = await hashPassword(body.password)
    await dbServices.registerUser(body)
    return res.status(consts.STATUS_CODES.TWO_HUNDRED_ONE).json({
      "message" : "User registered successfully"
    })
  }
  catch(e) {
    return sendErrorResponse(res, consts.STATUS_CODES.FIVE_HUNDERD, "User registeration failed")
  }

}
That's it. We have successfully followed all the steps in registering the user. But wait? how does all this get triggered in the first place? Let's find out
Routes & Final Touch
To understand how this works, think of the endpoint as a route. A route has multiple checkpoints. validateRequest and registerUser were our two checkpoints. Different routes can have different checkpoints.
Some might need 10 checkpoints and some might need only 1. Some of the checkpoints are common and can be used in multiple routes. So to make things easy, we put all those checkpoints in a folder called middlewares.
So if you think, validating an incoming request should be in our middleware because every request needs to be validated before processing it and working with it. You can create a common request validation function or you can create specific validation functions. All of them are usually present in the middleware.
The checkpoints where we write the logic related to our endpoint are present in controllers.
Registering a user is a core logical part of this endpoint so we put it in our controllers folder.
Now there is something called routes as well. The routes folder is where you define all the routes of your service.
const express = require('express');
const router = express.Router();
const authMiddleware = require('../middlewares/auth');
const authController = require('../controllers/auth'); // Import the controller


router.post('/register', [authMiddleware.validateRegisterRequest], authController.registerUser);


module.exports = router;
router is an in-built entity of the express framework. It lets us create multiple routes which makes our service/backend very organized.
router.post defines that the /register request is a POST endpoint. This function takes 3 parameters.
Endpoint
List of middleware functions
List of controller functions
As you can see, the first function present in the arguments is the validateRegisterRequest function. That's why it is the first function that gets triggered when the client sends a request to the /register endpoint.
Remember the next() in our validation function. It passes the baton to the next function in the list of arguements which is our registeruser function. Now it all makes sense right?
Final Piece of Puzzle
Remember our endpoint was `http://localhost:3000/auth/register`. We have figured out how the /register will work and we also know that our server will run on localhost:3000.
Now we will see how we add the /auth in the middle and why do we need it.
Imagine a list of folders like documents, downloads, movies, games etc and all the documents in documents folder and so on.
Similarly auth is like a folder. All the endpoints related to an authentication will lie inside the auth route. In our app.js we will make use of the express framework's inbuilt method called as use()
const express = require('express');
const authRouter = require('./routes/auth')
const authMiddleware = require('./middlewares/auth')

const app = express()

app.use(express.json());
app.use(express.urlencoded({ extended: true }));


app.use('/auth',authRouter)


module.exports = app
.use() has multiple use cases. It can be used to add middleware to your service. It can also be used to associate a custom middleware, authRouter, with a specific path, in this case, /auth. This means that any incoming requests starting with /auth will be directed to the routing logic defined within authRouter.
This approach is a fundamental part of route organization in Express, allowing you to apply specific routing logic to a particular path, making your application more modular and maintainable."
Now it all makes sense. We have finally connected our jigsaw and created our first successful API endpoint.
Run the following command. Open Postman add a new post request with some email and password in the body and hit the send button. If everything goes well, you will see that your user is registered successfully and you will get a successful response.
If not, then debug your code fix all the errors and make that API hit a success!
npx nodemon server.js
Conclusion
So this sums up article number two of our authentication service. In the next article, we will see how we can log in as a registered user.
We will learn about JWT tokens, rate-limiting and much more. Happy coding!