Introduction
Today, we will look at how you can integrate the Firestore Database with Flutter. Firestore Database is a NoSQL database provided by Firebase. It is super easy to integrate it with Flutter and you can easily scale your application by keeping Firestore as your primary database.
It is going to be a bit long article as we will explore all 4, i.e CRUD operations. Let's get started.
Prerequisites
Here is what we will need before we jump into writing the logic for CRUD.
- Latest Stable Version of Flutter
- A Firebase project
You can check your flutter version by typing flutter --version in the integrated terminal. If you are not on the latest version, then type flutter --upgrade in your terminal. The time taken to update your Flutter will depend on your Internet speed.
Now, let's move on to creating a Firebase project and then adding it to our Flutter project.
Go to the Firebase console, if you don't have an account then create one. On the dashboard, tap on the + icon to create a new project. Give it a name, press next, you will be asked if you want to enable A/B testing. Disable that and press next. That's it. Your new Firebase project has been created.
Now on the dashboard, you will see three icons, web, android, and ios. Tap on the android icon and you will reach this page.
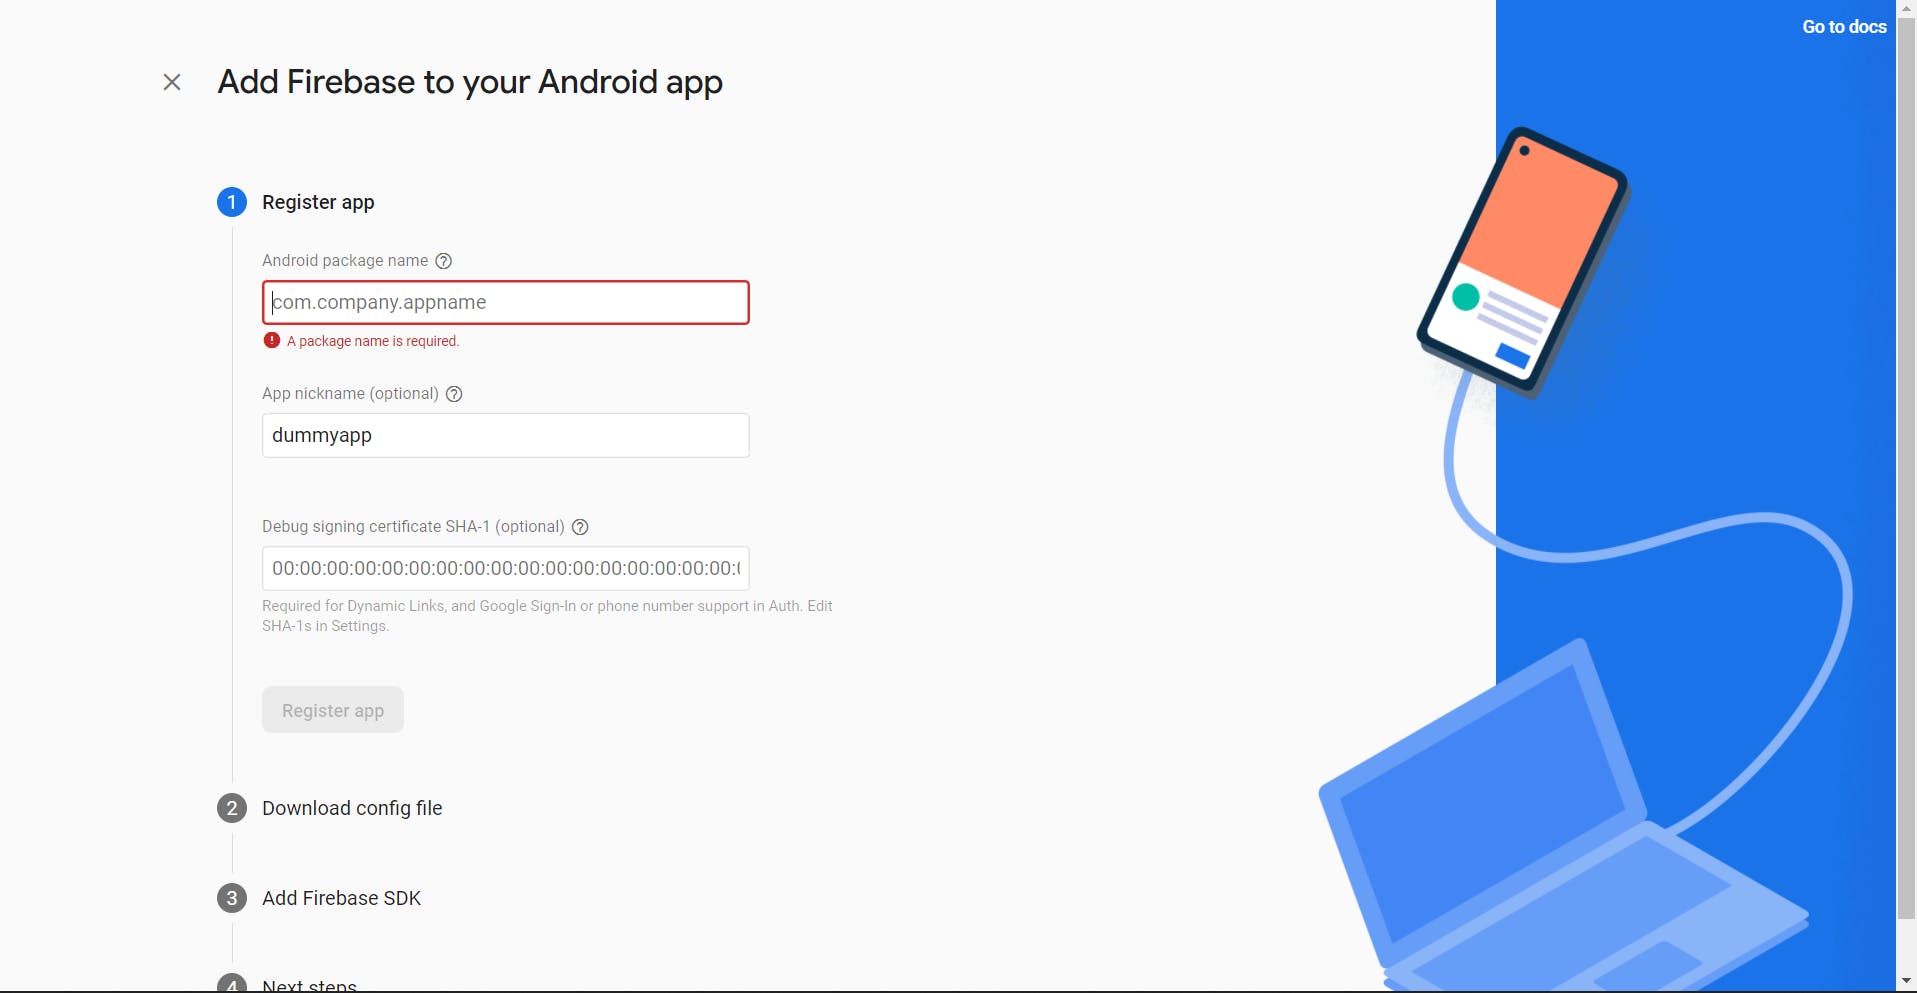
Here, you have to add the application id of your app. It can be found in the Gradle file. There are two Gradle files in your Flutter project directory. You have to go to the one which is inside the app folder.
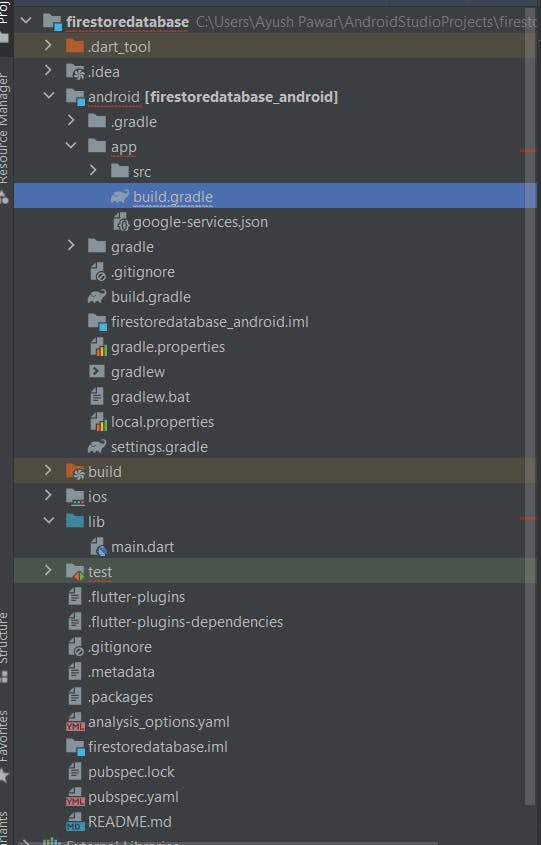
The next step, download the google-services file and move it to the android folder of your project directory. You can see in the above image that there is a google-services file in the android folder.
Now, press next and add the lines of code where it has been asked to add to. You will need to add 2 lines in the Gradle file of the android folder and 2 lines in the Gradle file of the app folder.
When you are done with all this, press proceed. Your project has been successfully created and set up for Android. Now, there is a line of code that we need to change to successfully make our project run.
Go to the app-level Gradle file and in there, change the minSdkVersion to 21. Something like this,
defaultConfig {
        // TODO: Specify your own unique Application ID (https://developer.android.com/studio/build/application-id.html).
        applicationId "<Your id>"
        minSdkVersion 21
        targetSdkVersion flutter.targetSdkVersion
        versionCode flutterVersionCode.toInteger()
        versionName flutterVersionName
    }
Now, in your pubspec.YAML, add these two dependencies.
dependencies:
  flutter:
    sdk: flutter
  cloud_firestore: ^3.1.10
  firebase_core: ^1.13.1
Tap on the pub-get button on the upper right-hand side or run the command; flutter pub get in your integrated terminal.
There is one final thing left to do. On your database page, you will see a tab called rules. Here is the screenshot.
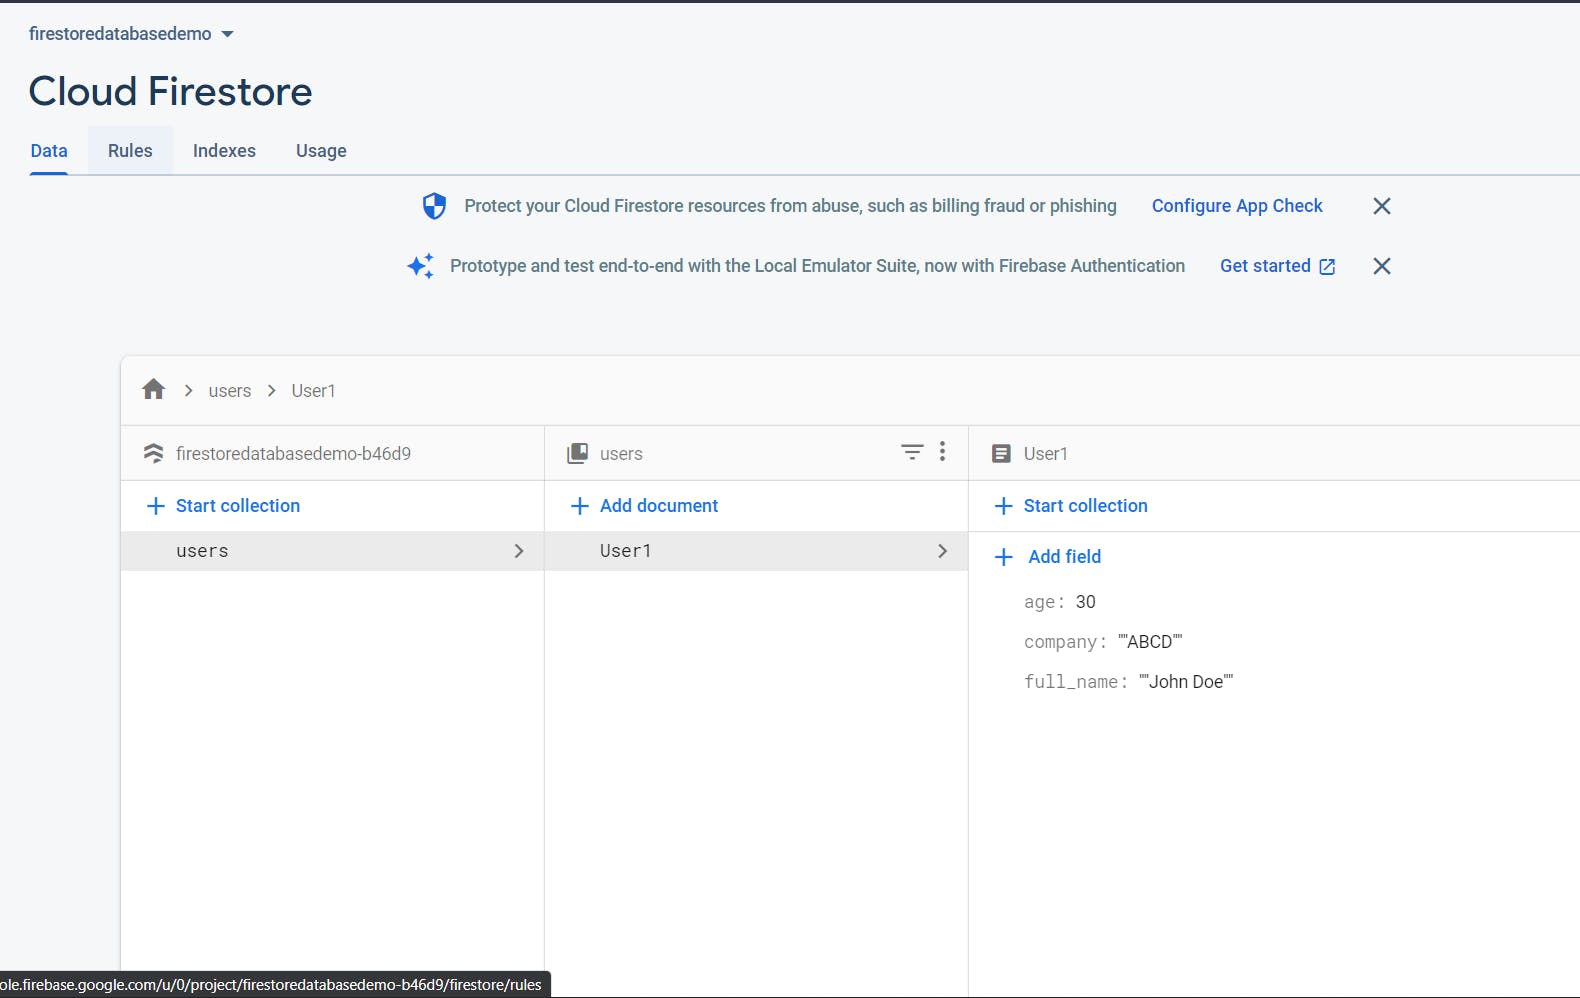
Tap on that "Rules" and copy-paste the below code in the code editor part of that page. Now press on Publish and that's it.
rules_version = '2';
service cloud.firestore {
match /databases/{database}/documents {
 match /{document=**} {
  allow read, write
  }
 }
}
With this, your Flutter project is configured with Firebase and ready to be integrated with the Firestore database.
Create Data
Let's work on creating and adding data to our Firestore database. I will be coding in the main. dart file so I will import these two packages in main. dart.
import 'package:cloud_firestore/cloud_firestore.dart';
import 'package:firebase_core/firebase_core.dart';
Now, in our main function, add these two lines of code
void main() async{
// add these two lines
  WidgetsFlutterBinding.ensureInitialized();
  await Firebase.initializeApp();
  runApp( MyApp());
}
This makes sure that our Firebase app has been initialized before running our flutter app.
We will be creating a database that stores the name, company, and age of a user. So let's create a function that adds a new user to the database. The code for it will look like this.
// an instance of the FirestoreCollection class. Our collection is named 'users'. If you don't have a collection, then this code will create a new collection and add data to it.

CollectionReference users = FirebaseFirestore.instance.collection('users');
  Future<void> addUser() {
    // Call the user's CollectionReference to add a new user.
    return users.doc('User1').set({
      'full_name': 'John Doe', // John Doe
      'company': 'ABCD', // ABCD
      'age': 30 // 30
    })
   .then((value) => print("User Added"))
   .catchError((error) => print("Failed to add user: $error"));
  }
When this function runs successfully, a new user will be added and our database will look like this
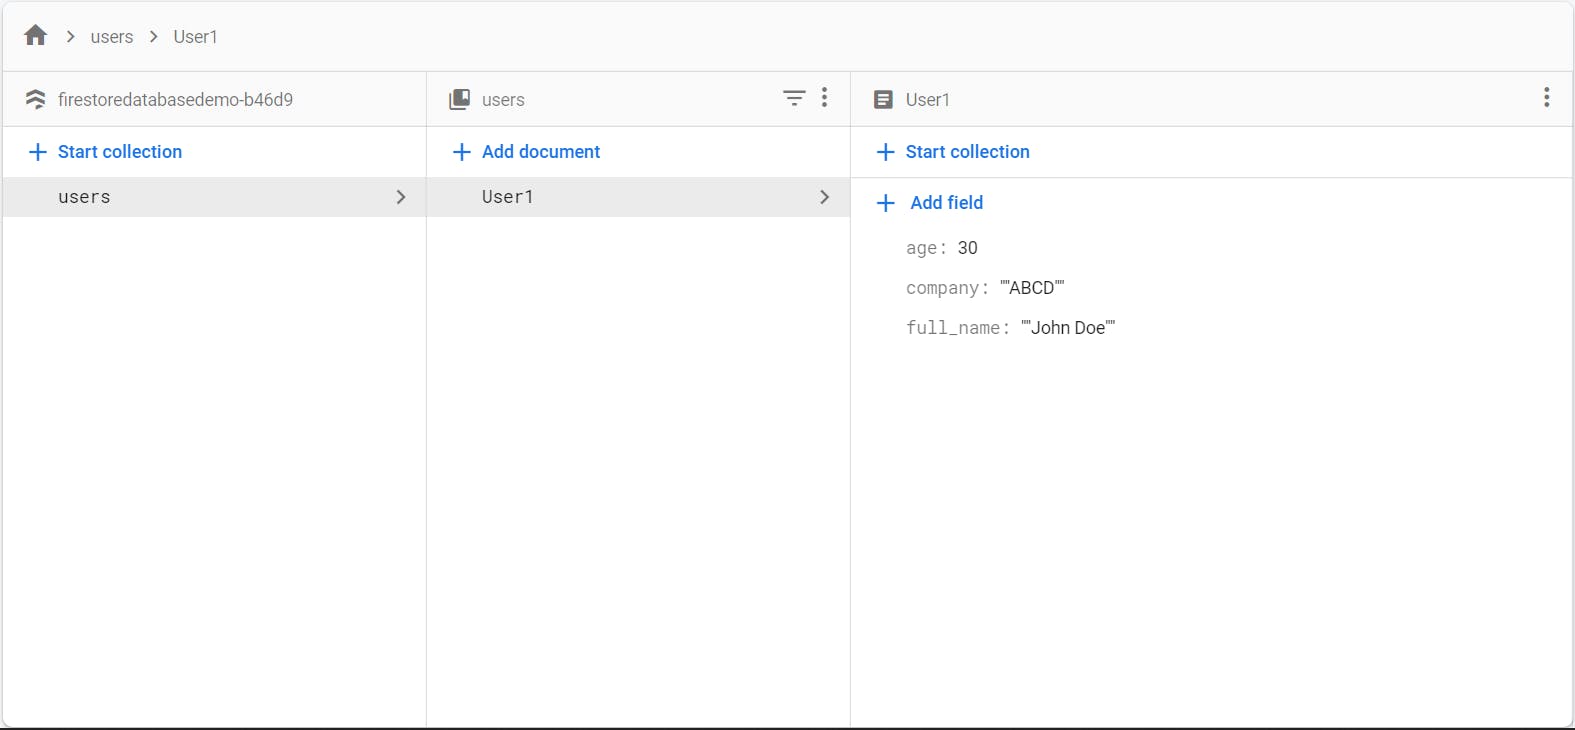
The above code creates a document called 'User1' inside the 'user' collection and adds the data in it.
Read Data
Now, let's have a look at how we can fetch and read the data coming from our database. For this, we will use Future Builder. If we were building a real-time chat app then we would have gone for Stream Builders. Here is what our code would look like for fetching data.
FutureBuilder<QuerySnapshot>(
 future: users.get(),
 builder:
 (BuildContext context, AsyncSnapshot<QuerySnapshot> snapshot) {
  if (snapshot.hasError) {
      return Text("Something went wrong");
   }
  if (snapshot.connectionState == ConnectionState.done) {
      return ListView.builder(
      shrinkWrap: true,
      itemCount: snapshot.data?.docs.length,  // number of users
      itemBuilder: (context,index)
      {
        String? x = snapshot.data?.docs[index].id.toString();
         return ListTile(title: Text(x!),);
       }
     );
    }
    return Text("loading");
  },
),
Let's understand the code.
We are awaiting the QuerySnapshot. Query Snapshot gives you the list of documents in a particular collection. If you want to access a specific document, then you can use a Document Snapshot instead of a Query Snapshot.
As you know, all the data coming from our users. get() function gets stored in the snapshot. So if there is an error we will show an error text.
We are using Listview. Builder to display a list of documents.
I am displaying the id of a document but you can also show the data inside the document by accessing it like this
If there is no/slow internet connection the screen will show a text "loading" till snapshot gets the data.
Map<String, dynamic> data = snapshot.data?.docs[index].data().toString() as Map<String, dynamic>;

String? x = data['full_name'];
So this is how you can access and render data from the Firestore Firebase on your screen.
Update Data
Now, let's have a look at how we can update data. This is completely the same as adding data. All we need to do is change the .set function. update. Like this,
Future<void> updateUser() async{
    // Changed the .set() to .update()

    return users.doc('User1').update({
      'full_name': 'John Delta', // John Doe changes to John Delta
      'company': 'ABCD',
      'age': 30
    })
        .then((value) => print("User Updated"))
        .catchError((error) => print("Failed to add user: $error"));
  }
Delete Data
Now, let's have a look at how we can delete data from our database. Once again, it is very easy. You just need to specify the document id you want to delete and that's it. The document will be deleted. Here is the code for the same
  Future<void> deleteUser() async{
    // Call the user's CollectionReference to add a new user
    await users.doc('User1').delete();
  }
If you notice, I have used an async-await function here. I have used this to show that you can work with both, .then or async-await. Both will get the job done. You can convert the whole update or add functions into async-await functions if that is how you like to do it.
User Interface
Now that we have created all the functions, we need to find a way to trigger them. So for that, we will create 3 buttons. One will add to the database, the second will update and the third will delete. This is the code for creating a button. Wrap all these 3 buttons in a column though.
TextButton(onPressed: addUser, child: Text("Create")),
TextButton(onPressed: updateUser, child: Text("Update")),
TextButton(onPressed: deleteUser, child: Text("Delete")),
If you are a visual learner, then go check out this video tutorial on integrating Firestore Database with Flutter.
Challenge
I have kept all the data in the code static. I have not created any text fields to get data from users and that is all. I think you should try that on your own. It would be a great way to practice and explore more about Firestore. Here are a few challenges that I would like you to do.
- Add 3 text fields in UI to take name, company, and age from the user. Pass that data to the database instead of the static data.
- Convert the FutureBuilder to StreamBuilder. (Look into official docs for some help)
- Try to implement a Google Sign-In feature with Firebase and make this a complete app.
If you don't know how to integrate Google Sign-In in Flutter with Firebase, then have a look at this tutorial.
Here is the whole working code up till now. Start the challenge by editing this codebase.
import 'package:cloud_firestore/cloud_firestore.dart';
import 'package:firebase_core/firebase_core.dart';
import 'package:flutter/material.dart';

void main() async{
  WidgetsFlutterBinding.ensureInitialized();
  await Firebase.initializeApp();
  runApp( MyApp());
}

class MyApp extends StatelessWidget {

  @override
  Widget build(BuildContext context) {
    return MaterialApp(
      title: 'Flutter Demo',
      theme: ThemeData(
        primarySwatch: Colors.blue,
      ),
      home: const MyHomePage(title: 'Flutter Demo Home Page'),
    );
  }
}

class MyHomePage extends StatefulWidget {
  const MyHomePage({Key? key, required this.title}) : super(key: key);

  final String title;

  @override
  State<MyHomePage> createState() => _MyHomePageState();
}

class _MyHomePageState extends State<MyHomePage> {
  CollectionReference users = FirebaseFirestore.instance.collection('users');

  Future<void> addUser() {
    // Call the user's CollectionReference to add a new user
    return users.doc('User1').
    set({
      'full_name': 'John Doe', // John Doe
      'company': 'ABCD', // Stokes and Sons
      'age': 30 // 42
    })
        .then((value) => print("User Added"))
        .catchError((error) => print("Failed to add user: $error"));
  }

  Future<void> updateUser() async{
    // Call the user's CollectionReference to add a new user

    return users.doc('User1')
        .update({
      'full_name': 'John Delta', // John Doe
      'company': 'ABCD', // Stokes and Sons
      'age': 30 // 42
    })
        .then((value) => print("User Updated"))
        .catchError((error) => print("Failed to add user: $error"));
  }

  Future<void> deleteUser() async{
    // Call the user's CollectionReference to add a new user
    await users.doc('User1').delete();
  }


  @override
  Widget build(BuildContext context) {
    return Scaffold(

      body: Center(
        child: Column(
          children: [
            FutureBuilder<QuerySnapshot>(
              future: users.get(), // get is an inbuilt function provided by CollectionReference
              builder:
                  (BuildContext context, AsyncSnapshot<QuerySnapshot> snapshot) {
                if (snapshot.hasError) {
                  return Text("Something went wrong");
                }
                if (snapshot.connectionState == ConnectionState.done) {
                  return ListView.builder(
                    shrinkWrap: true,
                      itemCount: snapshot.data?.docs.length,
                      itemBuilder: (context,index)
                  {
                    String? x = snapshot.data?.docs[index].id.toString();
                    return ListTile(title: Text(x!),);
                  }
                  );
                }

                return Text("loading");
              },
            ),
            SizedBox(height: 100,),
            TextButton(onPressed: addUser, child: Text("Create")),
            TextButton(onPressed: updateUser, child: Text("Update")),
            TextButton(onPressed: deleteUser, child: Text("Delete")),
          ],
        ),
      ), // This trailing comma makes auto-formatting nicer for build methods.
    );
  }
}
Conclusion
If you were with me till here, then CONGRATULATIONS!!! You have done a commendable job by successfully integrating the Firestore Database with Flutter. This was a long tutorial but also an important one.
You can appreciate and support my blogs via.

Also, let's connect on Twitter. Follow CSwithIyush for more amazing tutorials, tips/tricks on Flutter & DSA.

