


Intro
In todays' article, we are going to have a look at how you can render some amazing animations in your Flutter app with just 5 lines of code probably. Sounds impossible? It is not.
It has been made possible with the help of Lottie. Lottie is a third-party website that provides readymade animations. We also have a package called Lottie which makes the integration with Flutter super easy. Here is the link to the Lottie website. So let's see how we can add Lottie animations to our Flutter app.
Project Setup
First of all, we will need to add the Lottie package to the pubspec file of our project. We do it like this.
dependencies:
  lottie: ^1.2.2
Now run pub get. Now in your dart file where you are planning to code the logic, import the package like this.
import 'package:lottie/lottie.dart';
Coding the Logic (Animation 1)
Now, there are 2 ways to render the animation in your app. One is by using a URL and the second is by using an asset. When you go to the Lottie website and in the animations tab, tap on any animation and there you will see two options. One is download and the second is Lottie animation URL.
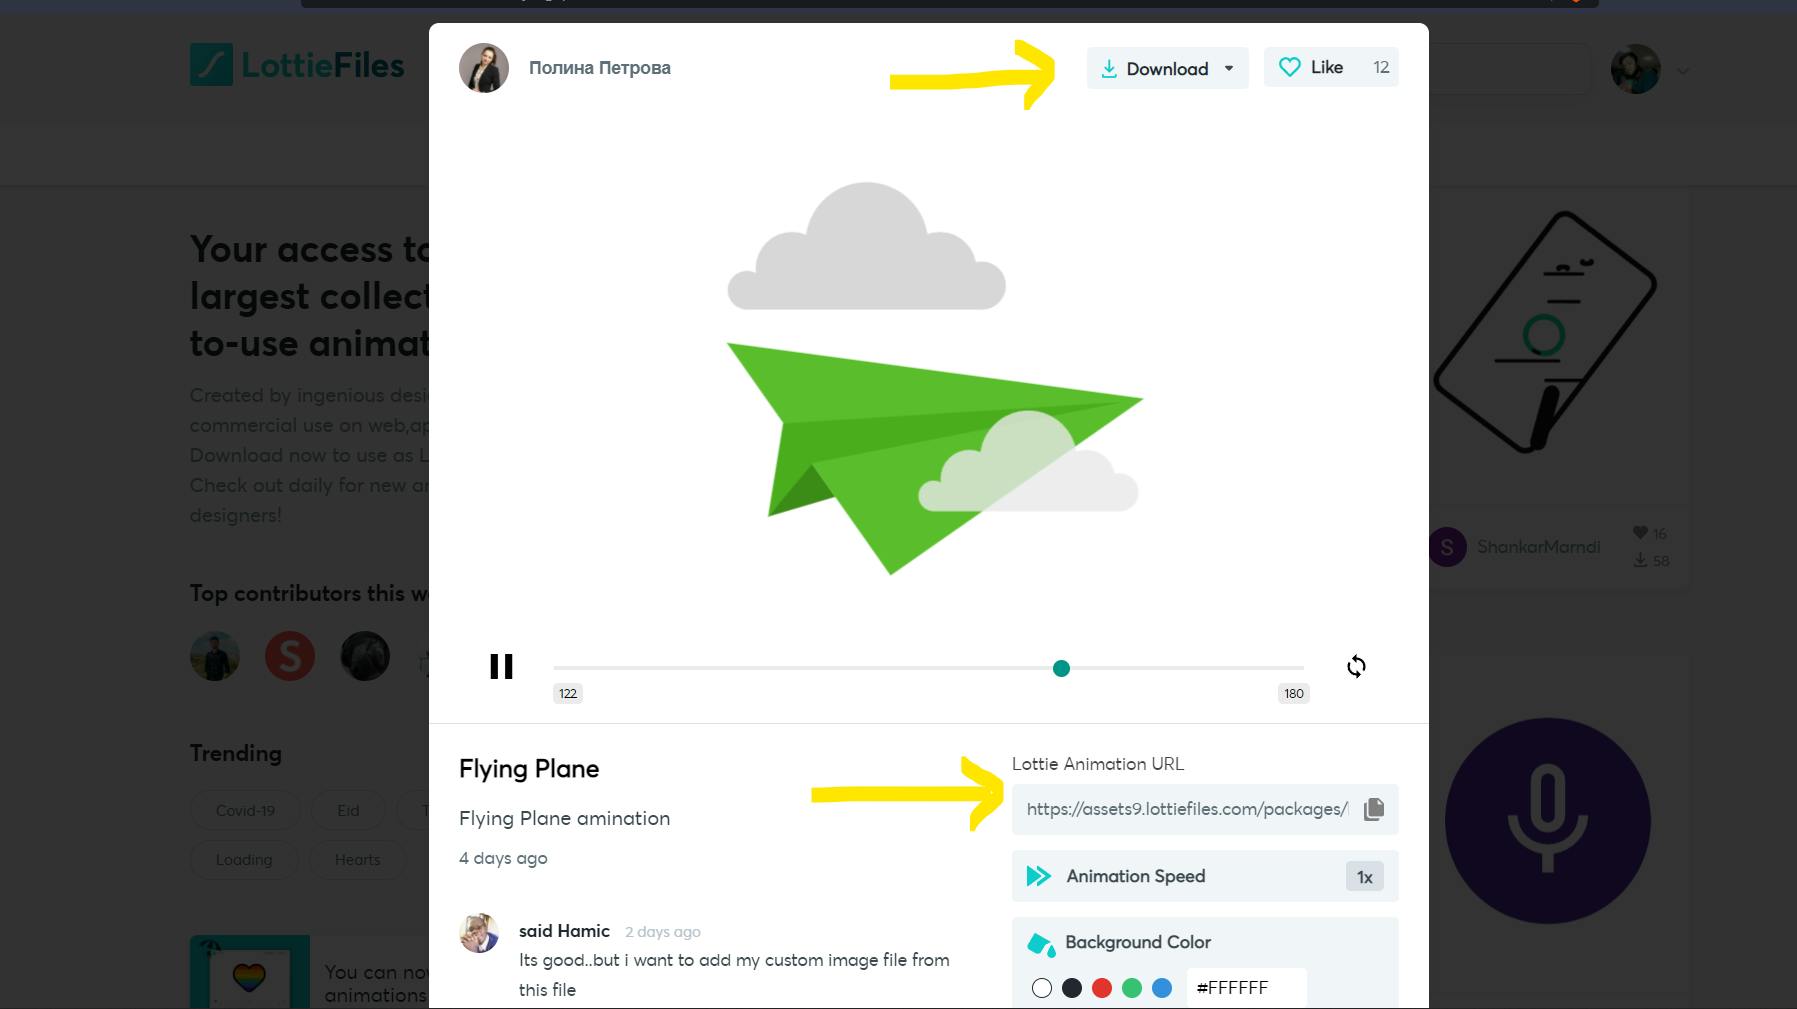
When you tap on the download button, you will get multiple options. Select the Lottie JSON option. A JSON file will be downloaded and then you can add it in your assets folder. If you don't want to do all this hard work then simply copy the URL and paste it like this in your app.
Scaffold(
body: Lottie.network(
        "https://assets10.lottiefiles.com/packages/lf20_if77rL.json",
        ),
)
THAT's IT. This is literally all you need to do to add a Lottie animation in your app. Now run your app and see if the animation has loaded successfully or not.
User Controlled Animations
The kind of animation we used above can be useful in your onboarding pages. I mean the app will become much better if we could interact with animations, wouldn't it? So now, we will create an interactive animation.
For this part, I will take a heart button animation. Tap here to get the exact animation that I have used.
Now get the URL of this animation and add it to your Lottie.network("the URL"). Since we are trying to interact with this emoji, we will need something to control it. So we will use AnimationController. We will also need a boolean which tells us the current state of the animation. So let's add these two things to our code.
  bool isLiked = false;   // the boolean which tells the current state of animation
  late final AnimationController controller; // our animation controller.
  @override
  void initState() {
    // TODO: implement initState
    super.initState();
    controller = AnimationController(vsync: this,duration:Duration(seconds:1));
  }
Make sure you use the SingleTickerProviderMixin with your class to use the vsync function in the AnimationController.
class _MyHomePageState extends State<MyHomePage> with SingleTickerProviderStateMixin{
  bool isLiked = false;
  late final AnimationController controller;
  @override
  void initState() {
    // TODO: implement initState
    super.initState();
    controller = AnimationController(vsync: this,duration:Duration(seconds:1));
  }
 /// Flutter Code
}
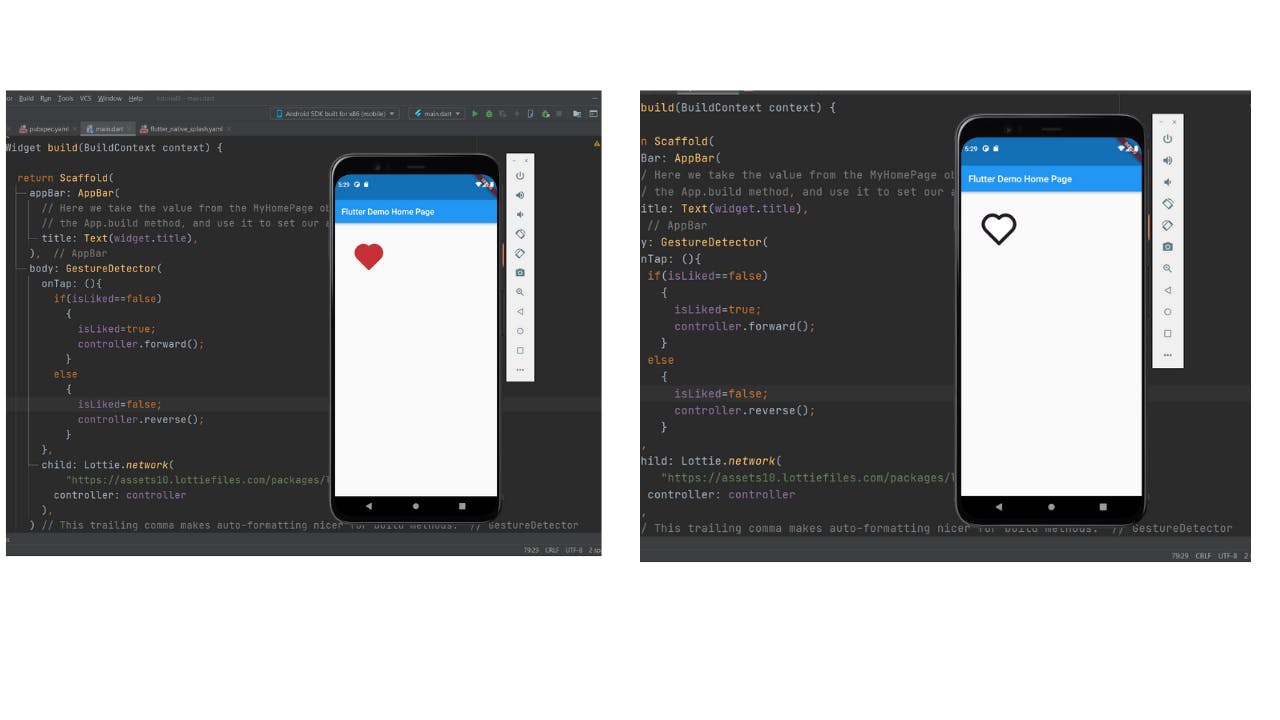
Now, let's wrap our Lottie widget with a gesture detector so that we can interact with it. In the on tap function of the gesture detector, add this code.
if(isLiked==false) // our heart asset is white in colour
            {
              isLiked=true;
              controller.forward();  // move the animation in forward direction
            }
          else            // our heart asset is red in color
            {
              isLiked=false;
              controller.reverse();    // move the animation in reverse direction
            }
I hope you understood this small piece of code. We have only one last thing to do now. In the Lottie.network asset, add this piece of code.
 Lottie.network(
       "https://assets10.lottiefiles.com/packages/lf20_if77rL.json",
          controller: controller  // add this line
        ),
Now, start your emulator and test the animation. Initially, your heart would be white in color. When you tap it, it will animate to red color. Now if you tap it again, it will animate back to white color.
This is how you create a controllable animation. To summarise in short.
- We create an animation controller and a variable to know the current state of animation.
- We then initialize the controller in the init state.
- We wrap our Lottie widget with a Gesture detector so that we can interact with it.
- In the onTap function of the Gesture detector, we add our logic of changing the animation however we want.
If you are more of a visual learner then check out this video tutorial.
Conclusion
So this concludes our article on how to add beautiful animations in your app with Lottie. The first animation was super easy to add but you will have to do some logical coding if you want to control your animations. That is what we did in our second animation example.
Follow CSwithIyush for more tutorials, tips&tricks on Flutter and DSA.