Introduction 😁
It's time to learn about another state management solution to make your Flutter apps better and faster. Today, we will deep dive into GetX state management for Flutter. In the last article, we learned about Provider and how to use it in your Flutter apps.
Check out the provider article if you want to learn about the provider.
Why GetX ❓
Before beginning with code, I will tell you why you can use GetX as a state management solution for your Flutter apps and how beginner-friendly it is.
There are 3 major reasons for it:
Productivity: With GetX you can use a wide range of code snippets with simple syntax. You can implement it in your project easily without any requirement of prior experience with state management. GetX brings maximum efficiency to your application by decreasing the development time, and increasing coding performance and reliability with minimum configurations.
Performance: GetX is a lightweight library that focuses on minimum resource consumption. It doesn’t rely on event systems like ChangeNotifier or Streams, but instead uses our own lightweight in-memory representation of the data.
Organization: With GetX, we get a decoupled system. The View and the business logic are separate which provides easy and uncomplicated syntax. Well, that was a lot of theory. Now without wasting any time let's see how to incorporate GetX into our Flutter apps. Just like the provider, I will be using our beloved counter app to explain to you how you can use GetX.

Project Setup
First of all, add the dependency in the pubspec file
dependencies:
  get: ^4.6.3
Run the flutter pub add get command in your integrated terminal and your dependency will be added.
The Counter App using GetX 🔨
So let's begin, we will break down this process into 3 steps.
- Creating the counter controller class
- How to connect the view and the business logic
- Creating the View Class (The UI Code)
Project Structure
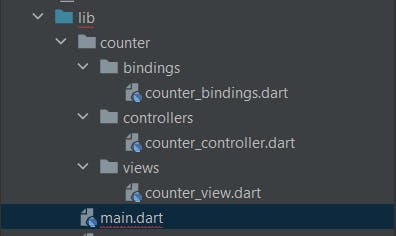
So, we will create 3 files, the counter controller, the counter binding, and the counter view class.
In the controller class, we will define the variables and the logic functions.
In the bindings class, we will bind the logic functions with the UI. It is mainly used to instantiate the controller classes.
View class handles the code for the UI, which will appear on the screen.
Also, in the main.dart change your MaterialApp to GetMaterialApp.
This is what your file structure should ideally look like.

Starting from the top, let's create a counter controller class.
Creating the counter controller class
Here is the code for the counter controller class.
class CounterController extends GetxController {
 final countVal = 0.obs;

 void increment() {
   countVal.value++;
 }
}
So in the above code, we have extended our basic class with a GetxController. I have declared the count variable with .obs, which means the count is observable, and whenever there is a change in this value, we can listen to that value via the controller class. Unlike providers, we do not need to call notify listeners. In the increment function, I am just increasing the count of the variable.
How to connect the view and the business logic
For this, we have the Binding classes. Here is the code for our CounterBinding class.
class CounterBinding extends Bindings {
 @override
 void dependencies() {
   Get.lazyPut(
     () => CounterController(),
   );
 }
}
We have extended our class with Bindings. This comes in-built with the getx package. We are using the Get.lazyput() method to initiate our CounterController class.
Now, what is lazyPut? lazyPut is nothing but lazily loading the dependencies. The dependency in our case is the counterController class. In lazyPut dependencies will be created immediately, but will be loaded to memory only when Get.find is called for the first time.
The above code was a glimpse of dependency injection. It is a huge topic which can be covered in its own article. All you need to remember for now is that this is how you create a binding of your logical class.
Creating the View Class (The UI Code)
Here is the code for the View class.
class CounterView extends GetView {

@override
 Widget build(BuildContext context) {
 final CounterController counterController = Get.put(CounterController());

   return Scaffold(
     appBar: AppBar(
       title: Text('Counter'),
       centerTitle: true,
     ),
     body: Center(
       child: Column(
         mainAxisAlignment: MainAxisAlignment.center,
         crossAxisAlignment: CrossAxisAlignment.center,
         children: [
       // Wrap our Text with Obx widget
           Obx(() =>
             Text(
               "Counter value is ${counterController.countValue}",
               style: TextStyle(fontSize: 25),
             ),
           ),
           SizedBox(height: 16),
           TextButton(
             style: ButtonStyle(
               backgroundColor: MaterialStateProperty.all(Colors.blue),
             ),
             onPressed: () {
           // increment the value of count variable on button tap.
               counterController.increment();
             },
             child: Text('Increment', style: TextStyle(fontSize: 14, color: Colors.white)),
           ),
         ],
       ),
     ),
   );
 }
}
There are two things different from the default code for the counter screen view. First is the line
final CounterController counterController = Get.put(CounterController());
The second is that we have wrapped our Text widget with something called Obx. So let's understand what these two things are.
Get.put is nothing but a dependency injection. Instead of creating an instance directly, we wrap it with an instance of Get (class). Get.put makes the dependency available to all the child routes. So, in case we need to access the same instance in some other class, we can do that using Get.find.
The Obx helps in observing the changes that occur to our countValue variable. Without Obx, we won't be able to update the changes to the variable.
Well, now if you run your Flutter app you will have an app powered with GetX state management. Congratulations on making this far and learning the basics of GetX.
You can now try to integrate GetX into more complex projects. You can also try to add more features to this counter app like decrementing, resetting, etc, and use GetX to manage the state.

Additional Features 😀
GetX is not only about state management, it is also an excellent tool to manage your routing and inflate your UI components without any context.
Route Management
There are different routing methods provided by GetX like Get.to(), Get.off(), Get.offAll(), Get.back().
Get.to() is used to just go from one page to another. So Get.to(Page2()) will take me to Page2.
Get.back() is just used to go back to the previous screen. You can also pass back arguments by adding them as parameters in Get.back(par: "Your val").
Get.off(Page2()) will remove the current page in the stack and just push the Page2.
Get.offAll(Page2()) is used to navigate to the next route, and remove all the pages currently present in the stack.
Inflating the UI Components
Generally, if you want to open a dialog or snack bar, you use a separate file that handles the common widgets and we also need to pass context to the class. But with GetX, we can simply create the UI component without using any context whatsoever.
Here is how you create a dialog box using GetX
Get.defaultDialog(
   title: 'Dialog Box example',
   middleText: 'This is text',
   buttonColor: Colors.blue,
   textCancel: "Cancel",
   textConfirm: "Accept");
This is how you can create a snackbar
Get.snackbar('This is a snackbar', 'Hey There', backgroundColor: Colors.black);
Conclusion 👋🏻
Well, this is it. This concludes our article for today. We have learned how you can incorporate the GetX state management solutions into a Flutter app. Even though it was just the counter app, the core logic of the logic class, binding class, and view class remain the same for all the other apps you would like to build.
I hope that you learned something new today. You can appreciate and support my blogs via.

Also, let's connect on Twitter. Follow CSwithIyush for more amazing tutorials, tips/tricks on Flutter & DSA.

