Table of contents
Introduction
Git is a powerful version control system that enables developers to manage their codebase efficiently, track changes, collaborate with others, and maintain project history. Whether you're new to programming or looking to understand Git basics, this guide will walk you through the fundamental concepts, essential commands, and tips to master Git as an engineer.
What is Git?
Git is a distributed version control system designed to handle everything from small to very large projects with speed and efficiency. It allows multiple developers to work on the same codebase simultaneously without conflicts, tracks changes made to files over time, and enables easy collaboration.
Git Installation
Installing Git is pretty simple. If you are on Linux machine, just type this command
sudo dnf install git-all
There are a few ways to install Git on Windows. The most official build is available for download on the Git website. Just go to https://git-scm.com/download/win and the download will start automatically. Note that this is a project called Git for Windows, which is separate from Git itself; for more information on it, go to https://gitforwindows.org.
To get an automated installation you can use the Git Chocolatey package. Note that the Chocolatey package is community maintained.
For macOS, There are several ways to install Git on macOS. The easiest is probably to install the Xcode Command Line Tools. On Mavericks (10.9) or above you can do this simply by trying to run git from the Terminal the very first time.
$ git --version
If you don’t have it installed already, it will prompt you to install it.
With git installed, Let's focus on understanding what git is and what are the most commonly used features of git. For simplicity, I have broken down the article into two parts.
Level 1
Level 2
In level 1, you will learn about clone , fork, add, commit, push, pull.
In level 2, you will learn about branches, merge, merge conflicts, and stash.
Level 1
Let's first understand the two most basic concepts of Git.
Clone
Fork.
What is Clone?
Let's say your friend and you are working on a project for a hackathon. Your friend has created a github repository which consists of initial code. Now you want to access code. How do you do it? You guessed it right. CLONING!

Cloning is creating a local copy of the repository. Cloning is simple. Go to any repository on Github. Press the green Code button, click the copy icon, go to your terminal, and paste the below command.
git clone https://github.com/Spyyy004/anidex.git
This simple command creates a local copy of the remote repository. So now there are two repositories.
The main repo that exists on Github servers.
The cloned repo that exists on your local system.
Your cloned repository is where you can do anything with your code. It is your playground. Whatever changes you make will be on your local computer unless you commit and push the code
What is commiting and pushing? We will see it later.
What is Fork?
Imagine this, you want to add a new function to the string method of python codebase. Python's code is open source. There are 2 ways to do this.
Find the repository's maintainer. Give him your code, hope he will add your code in the repo and you will get to use it.
Create a copy of python's codebase.(Forking!) Add the new function to your forked repository. Use it as much as you want!
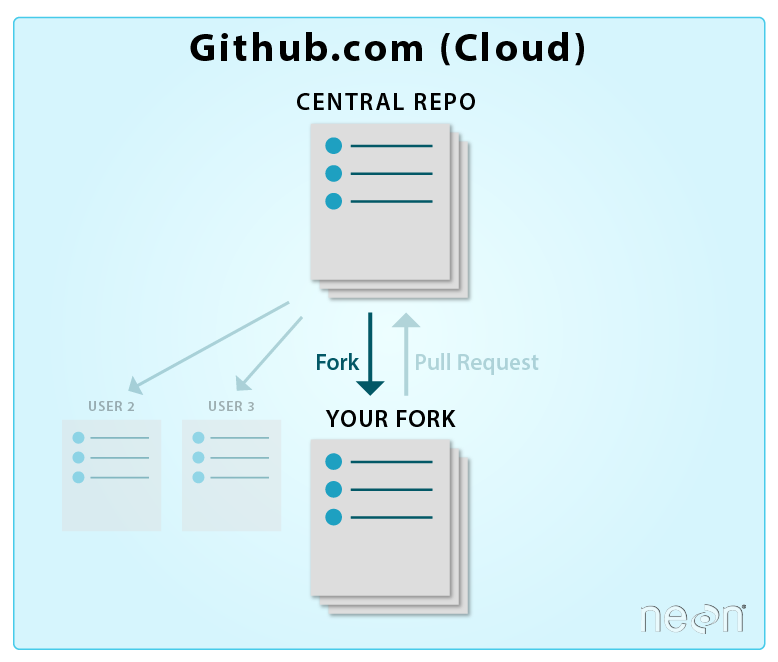
Forking is simpler than cloning. Go to any repository and just click the Fork button. A new page will open up which would ask by what name do you want your fork repo to be created and do you want to keep it public or private.

Forking creates a remote repository which you can treat as a personal playground. Making changes in the forked repository will not affect the main repository.
Once you have forked, you clone the forked repository, add your new function to string and voila.
So now there are 3 repositories.
The main repository.
The forked repository that exists on your Github account.
The cloned repository that exists on your local machine.

How does forking help?
See, python is a huge open source project used my millions of developers. Open source means anyone can contribute to Python. Just like how you had a thought of creating a function for strings, a lot of other developers have 100s of thoughts. It might happen that a lot of people didn't like your proposed new function (for valid reasons) and don't want it in Python but you are adamant of using it as it makes your life easier.
This is where forking helps. You create a fork and just create the function for yourself in your forked repository. No one else gets that function. It is a win win for everyone. If your function is really good and people see its value, you raise a PR (Pull request) and it gets merged to the main repository. Yay! You made an open-source contribution.
Don't know what is a PR? We will get to that later.
Fork or No Fork
So the industry is divided in two parts.
Fork the main repository, clone the forked repository, and clone the forked repository.
Clone the main repository directly without forking.
Both these methods have its advantages and disadvantages.
Open Source projects usually follow the first approach. Organizations follow both. Some orgs use the first approach and some the second.
Real Life Example
In this section, we will understand the concept of pull , add, commit, and push. All this with a real example. Let's break down the example in 2 scenarios
Scenario 1
Let's go back to the project which you and your friend were building.
Remember you cloned the repository? Awesome. Now you decided to add an api endpoint to get user profile. You coded the functionality, now you want to transfer this code to your friend. How do you do that?
Remember I told that there is a local repository that exists on your machine? Whenever you make changes to the code in VS Code or any code editor, your local repository needs to know what changes you are making. Let's say you made changes to route.js. So in order to let your local repository know, you do
git add route.js
The term which is used for files that is not known by local repository is untracked files When you do a git add <filename> , you are now tracking those files. Now your files are called staged files.
What if you made changes to 20 files in one go and want to add all the files together? Simple, just type the below command.
git add .
It is advised to not do git add . because it is not a good practice. You must always review all the files individually and add them one by one.
With git add you have created a temporary space where all your code changes are present. In order to let your local repository know about this changes, you simply do
git commit -m "my first commit"
With the above command, your local repository has all your changed code. You can replace "my first commit" with anything. It is just a message. Awesome! Next step is update your remote repository with code in your local repository.
You do it simply by typing
git push
That's it. So simple right! Your code is now on the remote repository present on Github.
Scenario 2
In the first scenario, you learned about add , commit, and push. In this scenario, you will learn about pull and merge.
Let's say your friend has coded a brand new landing page and he has pushed the code to remote repository on Github. How do you get that code on your system?
Simple. you do
git pull
This one command will sync your local repository with the remote repository and you will have the latest code.
Level 2
Great job reaching this far. You have a decent knowledge of git now. You can easily work on a repository which has a single branch. But in real world projects, there is rarely a codebase with just one branch.
Let's see what branches are and how do you work with them.
Branches
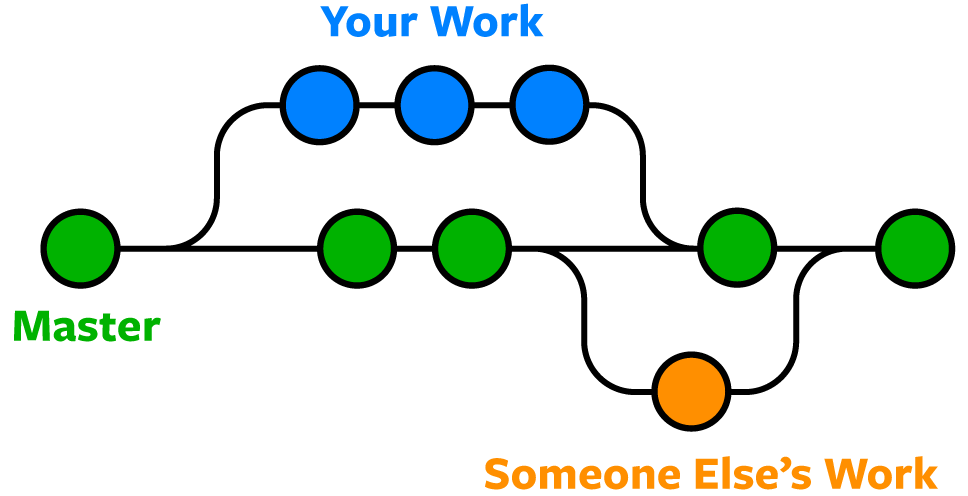
Imagine your code base as a huge tree with just one branch i.e the main branch. As the tree grows, new smaller branches pop out from the main branch. Similarly as the codebase grows, new branches pops out from the main branch.

The tree thing happens naturally but the git thing is in your hands. Usually, in real world, there will be countless branches in a codebase. There are several benefits of branches.
Branches are created whenever you want to work on a new feature. Rule of thumb : Whenever working on a new feature, cut a branch from main.
Once your feature is developed and tested thoroughly, the branch is merged with the main branch. This ensures that the main branch doesn't get buggy and messy code.
The main branch is the one whose code runs in the real world. Rest all the branches are used for development.
If you are working in an organization, there will usually be 2 branches from where the code is deployed
Main
Staging
Main branch is where code runs for the real-world. Staging branch is where code runs for the team for internal testing.
Staging branch is usually a mess and land of experimentation. So the process goes like this
Cut a branch from main
Code in your branch. Test it on your local server on your branch
Merge your code with the staging branch. Deploy your code on the staging server. Test your code on the staging server.
Once everything is tested and working properly, raise a Pull Request for the main branch or merge it directly if you have access.
Creating a branch is simple. Let's say you are on main branch and want to create a new branch. You simply type
git checkout -b "your_new_branch"
Let's say you are working on two different features on two different branches. How do you navigate between them? Simple
git checkout <branch_name>

Eg : git checkout feature001
With branches now in play, your commands like push and pull now become more powerful. You can do something like git pull origin <branch_name>. This means you want to pull code from a particular branch in your current branch. Don't worry about the origin keyword, we will cover it in later sections.
Similarly you can do git push origin <branch_name> to push code in some other branch from the branch you are working on.
Merging Code.
We read in the previous section about merging code. But what is merging? It is exactly what the word means. To merge.
Merging is quite similar to pull. If you do git pull, you get all the code present in the remote repository in your local repository.
When you do git merge a, all the code present in the branch a of your local repository
Remember how you cut a new branch to work on something? Once you are done working, you just merge the branch to the main branch. (if you have access) If you don't have merging access, you raise a Pull request for the main branch.
But how do you raise pull request? It is pretty simple. Once you are done with
git add .
git commit -m "my new code"
git push origin my_feature_branch
You go to github. Then select pull requests from the panel

On the pull requests page, you tap on New pull request.

Next, a page opens up where it asks you to select a branch, you select your branch and then you give a proper title and description for your request and press on create pull request.
The pull request then gets reviewed by your seniors and if everything is correct, the code is merged.
Struggles of Merge Conflict
You must have heard people banging their heads over something called as "Merge Conflicts". If you have not, then you will one day.
Merge conflicts occurs when git is confused while merging two pieces of code, but how can this situation even arise?
Let's understand with an example
Imagine you and your friend are working on a project. Let's say your friend and you working on a file called routes.js. He/She adds a function on line number 35 and pushes the code to the remote repository.
You also start coding in the same file because you want to add a new api route. Since the updated code is in the remote repository, there is nothing on line 35 for you. Your local repository is out of sync. So you code your new function and you also commit and push the code.
The moment you push the code, git will first ask you to pull code from the remote repository because local repository must be in sync before pushing to remote repository from your end.
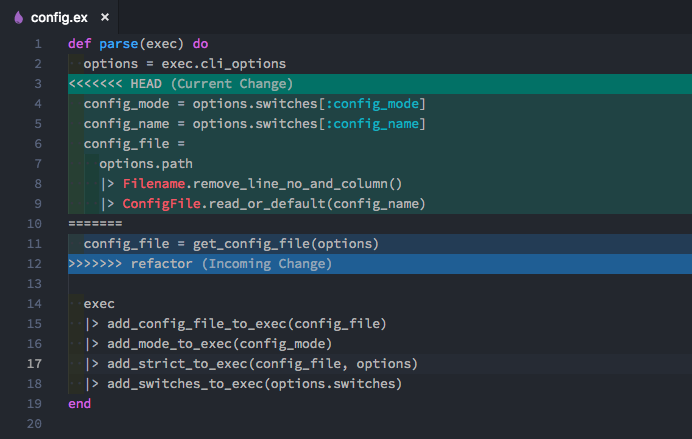
The moment you do git pull, git will throw an error saying it has encountered a merge conflict. This happened because the remote repository's code in route.js contained the function written by your friend but in your local repository, the code contained function written by you.
So git is now confused on what to do. There is only one way to solve this and it is to resolve the conflicts manually. VS Code has a decent interface where you will get to see the current code and the incoming code. It will ask if you want to keep your code, the incoming code, or both the code.

Resolving merge conflicts must be done very carefully because important code might get lost. Imagine the scale of code that might get conflicted in big organizations.
Hence the rule of thumb is: Always take pull from origin before coding anything on your local machine.
Difference between origin and remote
This is simple. Let's say you have forked a repository and cloned the fork repository then your upstream repository is the original one and origin is the forked one.
Git automatically knows the origin repository because you have cloned from it but it doesn't know which repository is the upstream. So you have to set the upstream by the following command git set upstream <repository_url>
Now when you will do git pull origin main you will get code from forked repository and git pull upstream main you will get code from the original repository.
Stashing Code
Congratulations on making this far. You have a lot of patience i might say. Now let's talk about a command which is very useful and i might say underrated as well.
It solves a very trivial problem that you will definetly face while coding in a company.
Let's say you are working on a feature x on branch feature x. Suddenly your senior comes up and gives you a prod bug to solve. Now, you have to create a new branch and make the fix. But what about all the code of feature x branch?
If you try to do a git checkout new_branch git will ask you to either commit your code or stash it. You will get a message like this
error: Your local changes to the following files would be overwritten by checkout:
        <code_file_name>
Please commit your changes or stash them before you switch branches.
As you can see, it is asking you to either commit or stash. By commiting the code, your code will be safe in the local repository but you don't want to commit half worked code. There might be 100s of logs and unpolished code that you don't want to commit.
This is where stash comes in to save the day. You can easily do git stash and all your code will be saved in a temporary place by git. After stashing you can easily switch and work on the new feature or bug.
Unstashing Code
Once you are back to your current branch, you can simply do git stash pop to get your stashed code back.
The best part of stash is that you can stash multiple times. So it is like a stack of code blocks.
You can see all the stashed code by git stash list
And you can pop specific stash by doing git stash pop <stash_id>
Next Steps
You have learnt quite a lot about git in today's article. This is probably 80% of the commands that you will use in everyday code.
What you don't know yet is rebase, reset, and cherry pick. I am thinking of writing another blog covering these 3 in detail because they are a bit advanced commands.
You can also google and learn about them though.
Conclusion
Well that's it. I hope you learnt something new today. Understanding Git is essential for every developer and I tried to cover all the day-to-day commands. Please drop in your feedback in the comments.

