


Introduction 👋🏻
If you are new to app development or Flutter, you may have heard the term "state management". You may have also heard that in order to become a good Flutter developer you must have a good command over state management. As a beginner, state management is not an easy topic and it may overwhelm you (It overwhelmed me). I spent weeks in order to get a good grip over it and managed to get decent in it.
I am writing this article so that you don't spend weeks over the concept of state management. There are multiple ways to manage the state in Flutter, like GetX, Provider, Bloc, Redux, etc. Today, we are going to learn about the most beginner-friendly state management solution i.e Provider.
Before jumping into the provider, let's understand what is a state and how setState is used to manage the state by default.

What is a state and setState ❓
I would like to explain about state by taking an example of the counter app. Suppose I have an app where after I press a button, the count of a number which is displayed on the screen, increases by one. So; 1-->press button-->2.
The change of 1 to 2 on the screen is called a change of state. So 1 displayed on the screen is a single state and 2 displayed on the screen is the second state.
How does setState change the state?
So suppose I have stored the value of the 1 on screen in a variable called num. In order to change the value to 2, I will do num=num+1. Now, if I want this change to be reflected on the screen, I will wrap this piece of code with a setState.
--- Some Flutter code ---
setState(()
 {
   num=num+1;
  }
);
--- Some Flutter code ---
What setState does is, it refreshes the whole page. So basically every widget on that screen is rebuilt and hence the 1 becomes 2. This is a good solution but supposes there are a lot of widgets on that page and you only need to change the value of one tiny text, is it good to refresh the whole screen for that? It is a very tedious work for Flutter to rebuild all the widgets again and again

setState is not a villain. It is a very good solution to handle state management. In fact, I have used setState in all my personal projects. The Flutter team has done a very good job on it and you really won't notice any changes in the performance of the app even with setState(through the naked eye). But, why not tackle the problem with a better way if there is a better way out there?
Here is where different solutions like Provider and Bloc come in. As said above, today we will focus on how we can use Provider to efficiently manage the state in your Flutter apps.
Managing State with Provider ✌🏻
We will carry on with the counter app. We will see how we can update the value of 1 to 2 without refreshing the whole screen. In order to use Provider, you need to first add it as a dependency in the pubspec file
dependencies:
  cupertino_icons: ^1.0.2
  flutter:
    sdk: flutter
  provider: ^6.0.1
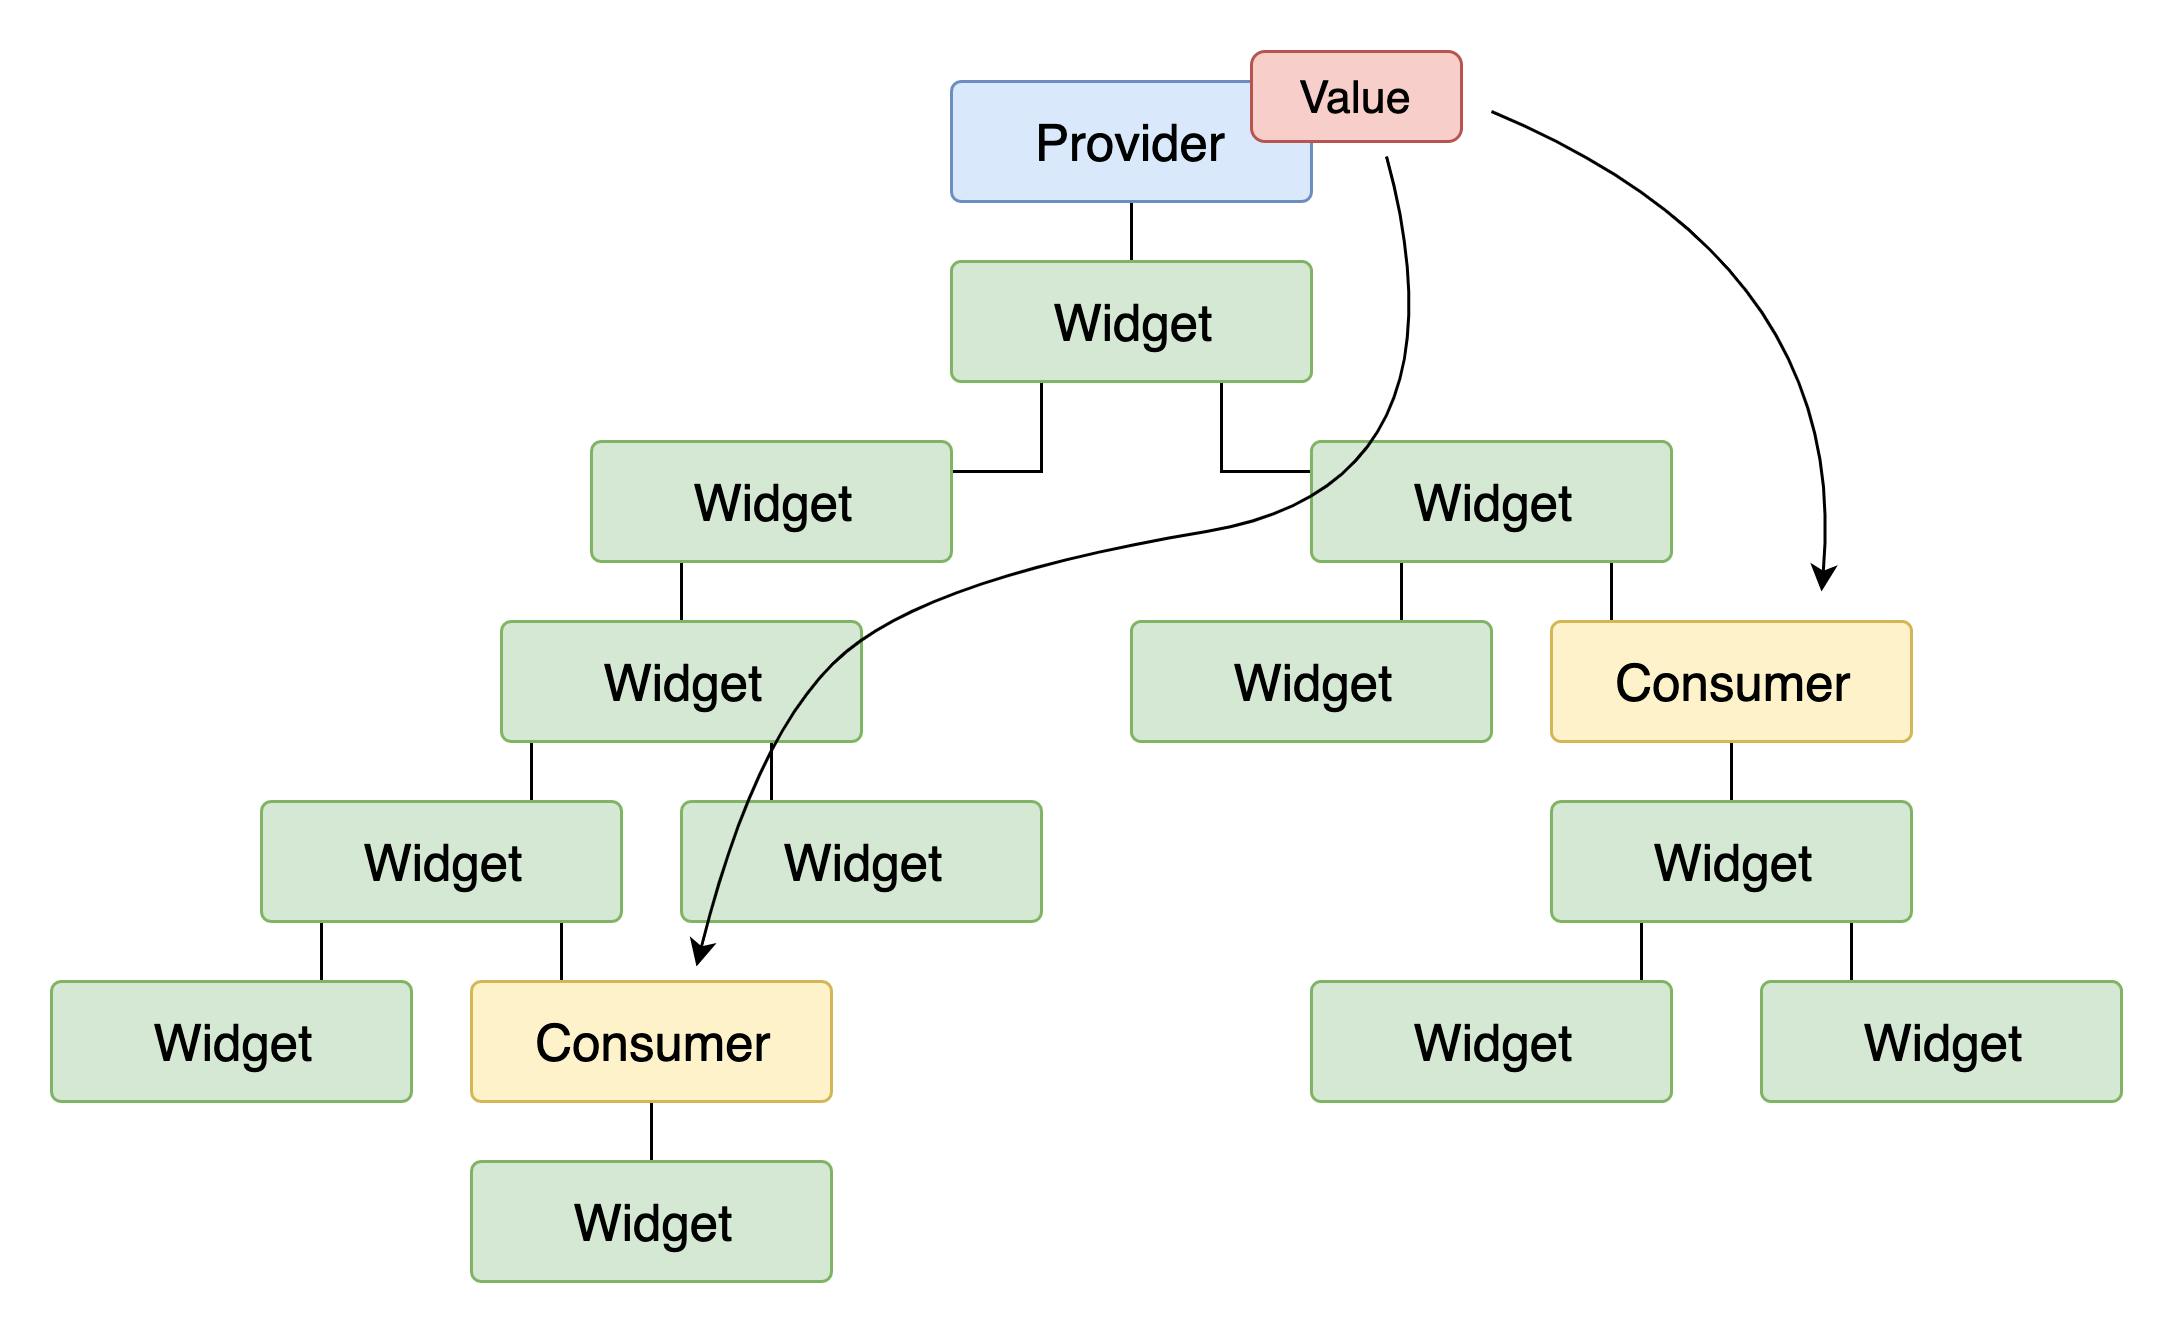
Have a look at the below image, this is a widget tree of a Flutter app. We will get to know what consumer is ahead but this is how the Provider helps in passing the data directly only to the widgets that need it.
Use of ChangeNotifier
To begin with, we will first create a class called Counter and extend it with the ChangeNotifier. ChangeNotifier is a method provided by the provider package that we will use wherever we need to do some logic work in our classes.
class Counter extends ChangeNotifier {
  var _count = 0;
}
We will create a function called incrementCounter and then increment the value of the variable inside it.
void incrementCounter() {
    _count += 1;
  }
In order to make use of the change notifier, we need to add notifylistners to the end of this function. What this line of code does is that it notifies all the widgets which contain this variable that the value of this variable has changed.
So suppose in the text widget of the column widget on the home page I am using the count variable then notifylistners will notify the text widget about this change.
Next, we will create a getter which will be used to get the value of the count variable. So the whole class code looks like this.
import 'package:flutter/material.dart';

class Counter extends ChangeNotifier {
  var _count = 0;
  int get getCounter {
    return _count;
  }

  void incrementCounter() {
    _count += 1;
    notifyListeners();
  }
}
Updating the Widgets 💪🏻
Now that we have written the code to update our counter, let's see what changes we need to make in our UI code so that the provider state management works smoothly.
Since we were using setState previously, our Home widget would be a stateful one. The best part of the provider is that we don't need stateful widgets to update the states. We can do it in stateless widgets. So let's convert the stateful home widget to a stateless one. Here is the code for the same.
import 'package:flutter/material.dart';

void main() {
  runApp(MyApp());
}

class MyApp extends StatelessWidget {
  @override
  Widget build(BuildContext context) {
    return MaterialApp(
      title: 'Flutter Demo',
      theme: ThemeData(
        primarySwatch: Colors.blue,
        visualDensity: VisualDensity.adaptivePlatformDensity,
      ),
      home: MyHomePage(title: 'Flutter Demo Home Page'),
    );
  }
}

class MyHomePage extends StatelessWidget {
  int _counter = 0;
  final String title;
  MyHomePage({this.title});
  void _incrementCounter() {

}
  @override
  Widget build(BuildContext context) {
    return Scaffold(
      appBar: AppBar(
        title: Text(title),
      ),
      body: Center(
        child: Column(
          mainAxisAlignment: MainAxisAlignment.center,
          children: <Widget>[
            Text(
              'You have pushed the button this many times:',
            ),
            Text(
              '$_counter',
              style: Theme.of(context).textTheme.headline4,
            ),
          ],
        ),
      ),
      floatingActionButton: FloatingActionButton(
        onPressed: _incrementCounter,
        tooltip: 'Increment',
        child: Icon(Icons.add),
      ),
    );
  }
}
ChangeNotifierProvider and Consumer
In order to make the above code work, we will wrap our MaterialWidget with the ChangeNotifierProvider widget.
ChangeNotifierProvider is the widget that provides an instance of a ChangeNotifier to its descendants. It comes from the provider package.
ChangeNotifierProvider(
  create: (_) => Counter(),
  child: MaterialApp()
)
When our app starts, the Counter class gets created and then our UI is built.
Note that we’re defining a builder that creates a new instance of Counter. ChangeNotifierProvider is smart enough not to rebuild Counter unless absolutely necessary. It also automatically calls dispose() on Counter when the instance is no longer needed.
We use the Consumer widget provided by the provider package to consume the changes made by ChangeNotifier.
We wrap the Text widget with the Consumer widget because we only want the text to change on the whole screen. If we want some other widget to update as well then we wrap it with Consumer as well.
Consumer<Counter>(
  builder: (context, CurrentValue, child) {
    return Text("${CurrentValue.counter}");
  },
);
We must specify the type of model that we want to access. In this case, we want Counter, so we write Consumer. If you don’t specify it, the provider package won’t be able to help you. the provider is based on types, and without the type, it doesn’t know what you want.
The builder is called with three arguments. The first one is context, which you also get in every build method.
The second argument of the builder function is the instance of the ChangeNotifier. It’s what we were asking for in the first place. You can use the data in the model to define what the UI should look like at any given point. Remember the getter we created in the Counter class, well we access it with this parameter.
The third argument is child, which is there for optimization. If you have a large widget subtree under your Consumer that doesn’t change when the model changes, you can construct it once and get it through the builder.
Remember the notifylistners() we used inside the increment function? Well, it goes into the widget tree and searches for all the Consumer widgets. And it notifies them about the changes to the variable.
I hope it makes sense now. If we want to use more than one provider, we wrap our material widget with the MultipleProvider widget. Rest everything is the same.
Provider.of method
Now we will look at what to do when the increment button is clicked. We just add this line of code in the onPressed attribute of the FloatingActionButton
Provider.of<Counter>(context,listen: false).incrementCounter()
As you can see we use Provider.of(context,listen: false).incrementCounter with listen:false, if listen is true then the whole build() method would get called.
Complete Code & Challenge 😎
Here is the code for the home screen followed by the code for our Counter class
class MyApp extends StatelessWidget {
  @override
  Widget build(BuildContext context) {
    return ChangeNotifierProvider<Counter>(
      create: (BuildContext context) =>  Counter(),
      child: MaterialApp(
        title: 'Flutter Demo',
        theme: ThemeData(
          primarySwatch: Colors.blue,
        ),
        home: MyHomePage(title: 'Flutter Provider Tutorial'),
      ),
    );
  }
}

class MyHomePage extends StatelessWidget {
  MyHomePage({Key? key, this.title}) : super(key: key);

  final String? title;

  @override
  Widget build(BuildContext context) {
    return Scaffold(
      appBar: AppBar(
        title: Text(this.title!),
      ),
      body: Center(
        child: Column(
          mainAxisAlignment: MainAxisAlignment.center,
          children: <Widget>[
            Text(
              'You have pushed the button this many times:',
            ),
            Consumer<Counter>(builder: (context, Model, child) {
              return Text(
                '${Model.counter}',
                style: Theme.of(context).textTheme.headline4,
              );
            }),
          ],
        ),
      ),
      floatingActionButton: FloatingActionButton(
        onPressed: Provider.of<Counter>(context,listen: false).incrementCounter,
        tooltip: 'Increment',
        child: Icon(Icons.add),
      ),
    );
  }
}
import 'package:flutter/material.dart';

class Counter extends ChangeNotifier {

  int _counter = 0;

  int get counter => _counter;

    void incrementCounter() {
      _counter++;
      notifyListeners();
  }
}
What we saw today was a very basic example of the Provider package. This knowledge of the Provider package is enough to make some beginner-level apps with a good state-management solution. You can now try to use Provider in a to-do list app. Instead of updating your to-do list with the setState, try to add a provider and tweak the logic of your code.
If you don't want to implement a whole new app with provider state management, then try to add more functions to this app itself. Here is what you can do in this app in order to practice provider
- Add a decrement button and a decrement function
- Add a reset button and a reset function
- Add another variable and another increment button. [You may need MultipleProvider]
All the work and thinking lies in the class where you are writing your main logic. I hope you were successful in creating the counter app with the Provider package.

Conclusion 👋🏻
So this was it. I hope that today you were able to get something out of this article. We learned how you can change your setState logic to provider logic with an example of the counter app.
You can make some very complex apps with Provider and without making the code complicated. As we saw, the provider package is so easy to understand and it is indeed beginner friendly.
You can appreciate and support my blogs via.

Also, let's connect on Twitter. Follow CSwithIyush for more amazing tutorials, and tips/tricks on Flutter & DSA.